Aural Fabric
An interactive sound map made with conductive textiles
In this post Alessia Milo introduces Aural Fabric, a captivating interactive sound installation consisting of a textile map which plays back field recordings when touched.
Aural Fabric is an interactive textile map allowing you to listen to selected field recordings by touching areas of the map that can sense touch. This project uses conductive thread, capacitive sensing and Bela to process sensor data and play back the field recordings. The first map that was made represents a selection of sounds from the area of Greenwich, London. The field recordings of the area were captured with binaural microphones as part of a group soundwalk led by myself and Chris Wood that was part of a study on sonic perception. For the installation I chose the recordings of particular locations on the map that have a unique sonic identity, which you can listen to here. The textile map was created as a way of presenting these recordings to the general public.
When I created this project I wanted people to be able to explore the fabric surface of the map and hear the field recordings of the specific locations on the map as they touched it. I decided that an interesting way to do this was with conductive thread that I could embroider into the layout of the map. To read the touches from the conductive areas of the map I decided to use the MPR121 capacitive touch sensing board along with a Bela board. What follows are some of the considerations I had along the way, and some detail on the technical choices I made.
Designing the map

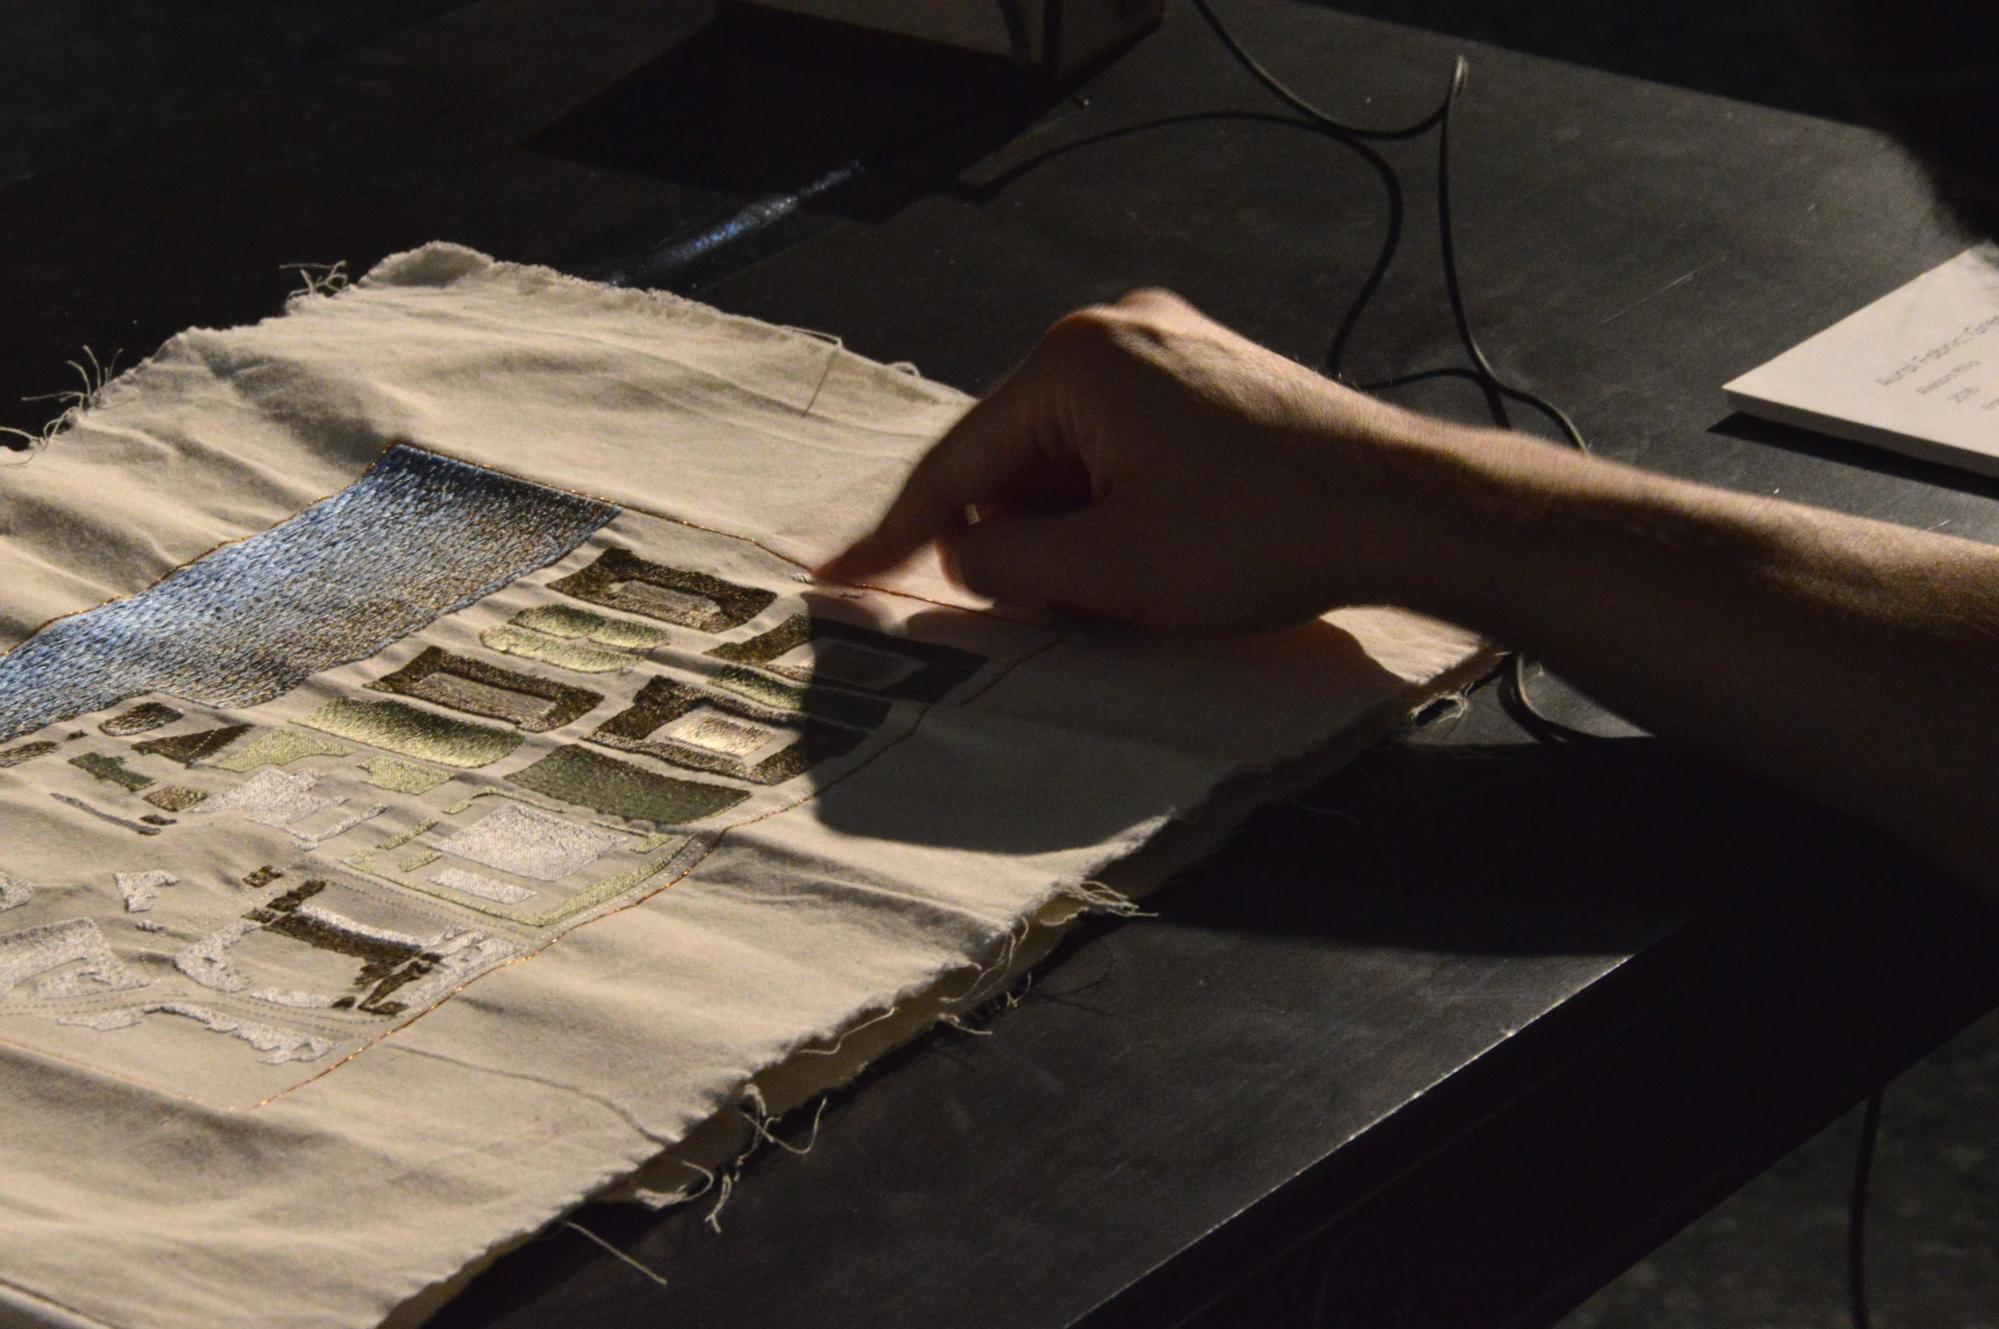
Detail of the top layer.
Step 1: selecting the exact area to be represented
I first considered the scale of the map based on how big the conductive areas could be in order to be touched comfortably, and on the limits of the embroidery machine used (Brother Pr1000E) which I used in the Materials Lab at Queen Mary University of London. I finally settled on a 360mmx200mm frame. The vector traces from the map of the area (retrieved from OpenStreetMap) were reduced to the minimum amount needed to make the map recognizable and easily manageable by the embroidery PE-Design 10 software, which I used to transform the shapes into filling patterns.
Step 2: simplifying the map and creating symbols
Linen was chosen as the best material for the fabric base due to its availability, resistance and plain-aesthetic qualities. I decided to represent the covered areas we entered during the soundwalk as coloured reliefs completely made of grey/gold conductive thread. The park areas were left olive-green if not interactive and green mixed with the conductive thread if interactive. This was to allow the map to be clearly understood in its different elements. Courtyards we crossed were embroidered as flat areas in white with parts in conductive thread, whilst landmarks like the Cutty Sark ship and the pier buildings were represented with a mixture of pale grey, with conductive thread only on the side where the walk took place.
The River Thames, also present in the recordings, was depicted as a pale blue wavy surface with some conductive parts close to the sides where the walk took place. Buildings belonging to the area but not covered in the soundwalk were represented in flat pale grey hatch.
The engineering process
The fabric was meticulously embroidered with coloured rayon and conductive threads thanks to the precision of the embroidery machine. I tested the conductive thread and the different stitch configurations on a small sample of fabric to determine how well the capacitive charges and discharges caused by touching the conductive parts could be read by the breakout board.
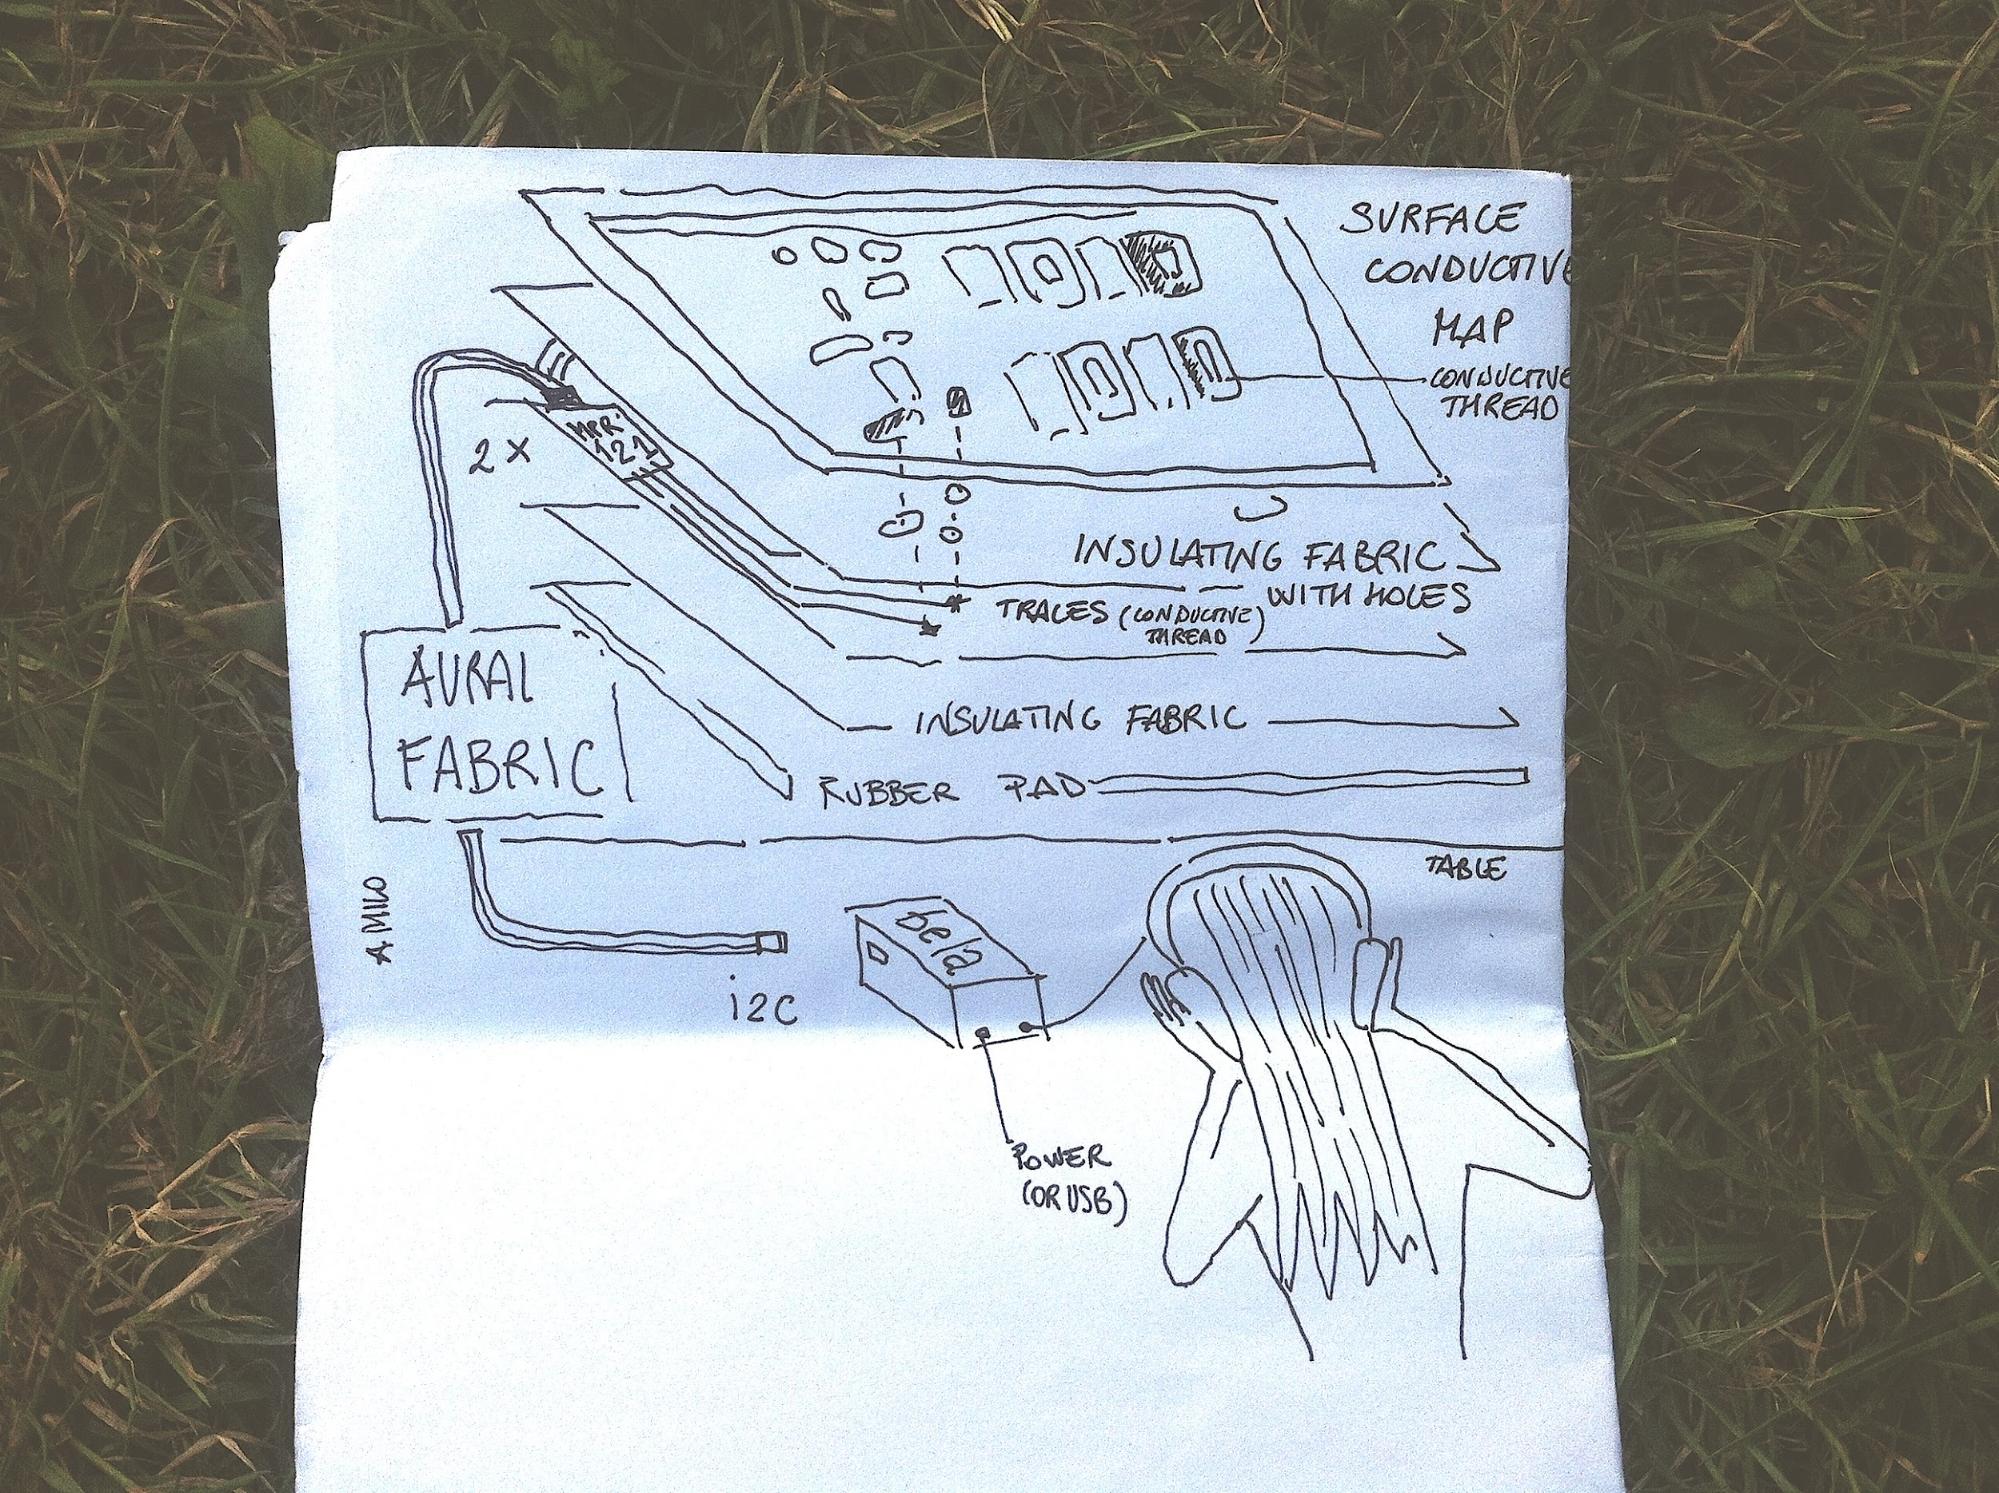
Diagram of the different elements of the interactive fabric.
The whole map consists of a graphical layer, an insulation layer, an embroidered circuit layer, a second insulation layer, and a bottom layer in neoprene which works as a soft base. Below the capacitive areas of the top layer I cut some holes in the insulation layer to allow the top layer to communicate with the circuit layer. Some of these areas have been also manually stitched to the circuit layer to keep the two layers in place. The fabric can be easily rolled and moved separately from the Bela board.
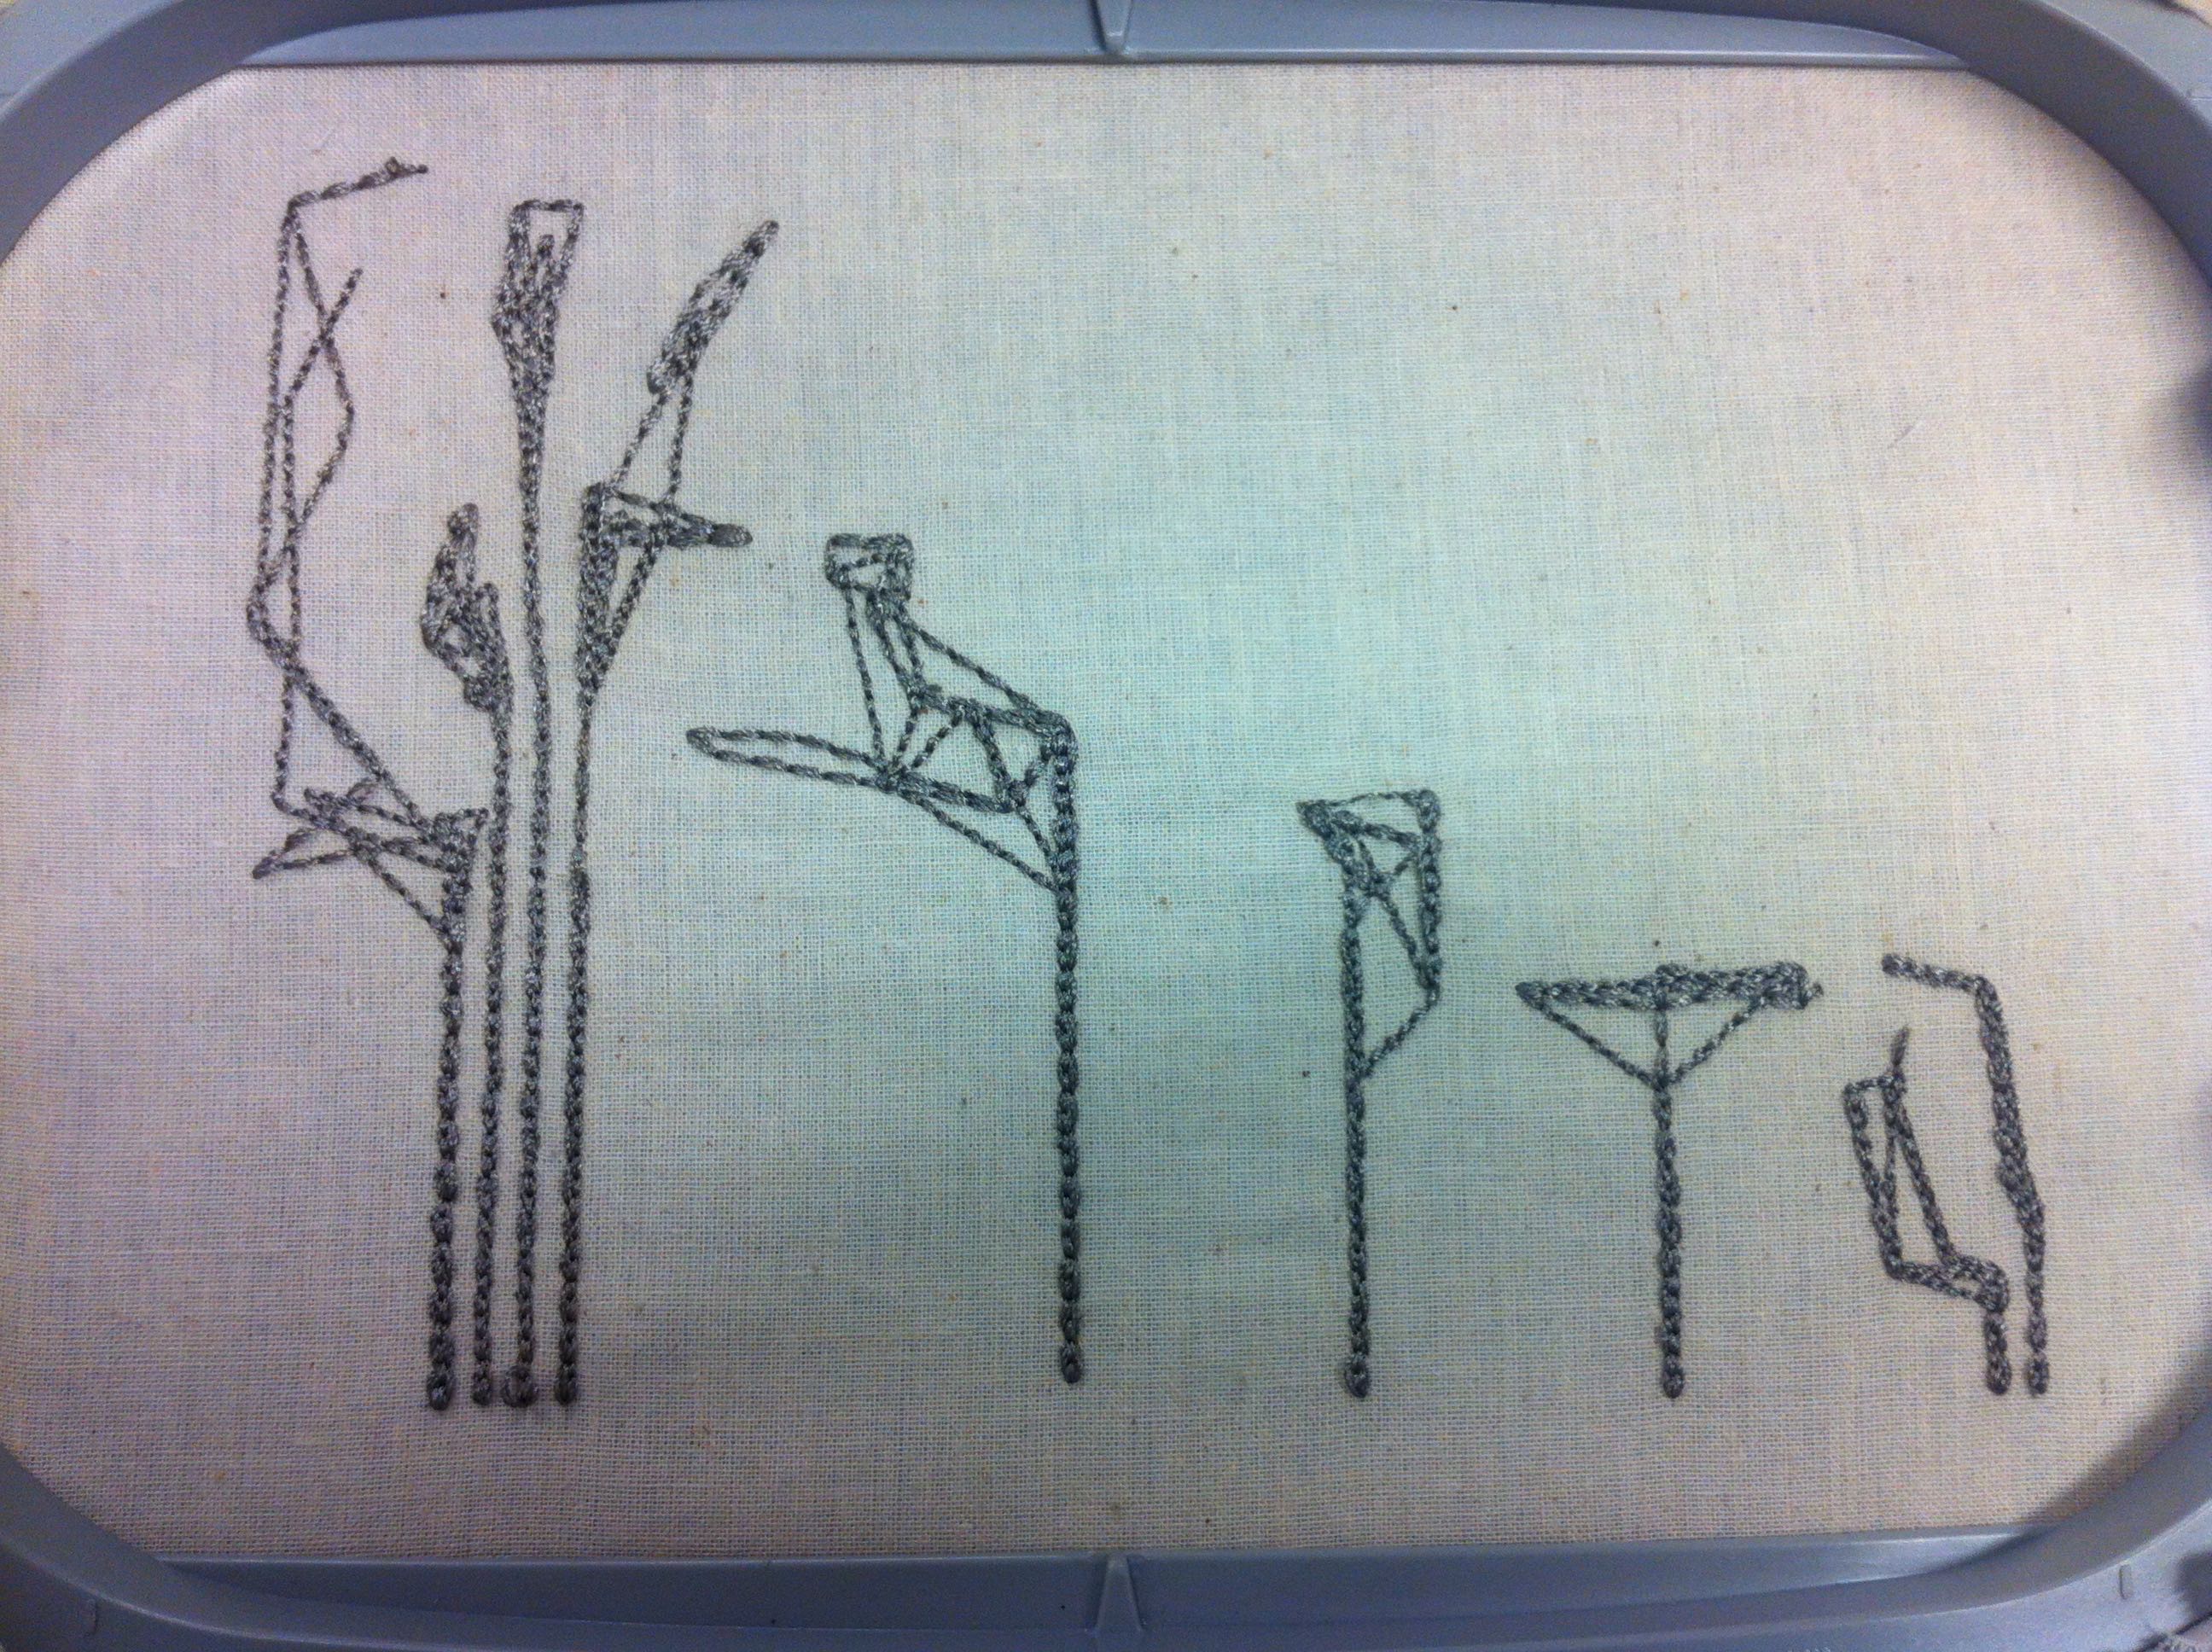
Some of the embroidered underlying traces. The first two traces appear too close in one point: when the fabric is not fully stretched they risk being triggered together!
Stitching the breakout board
Particular care was taken when connecting the circuit traces in the inner embroidered circuit layer to the capacitive pins of the breakout board. As this connection needs to be extremely solid it was decided to solder some conductive wire to the board, pass it through the holes beforehand, and then stitch the wires one by one to the correspondent conductive thread traces, which were previously embroidered.
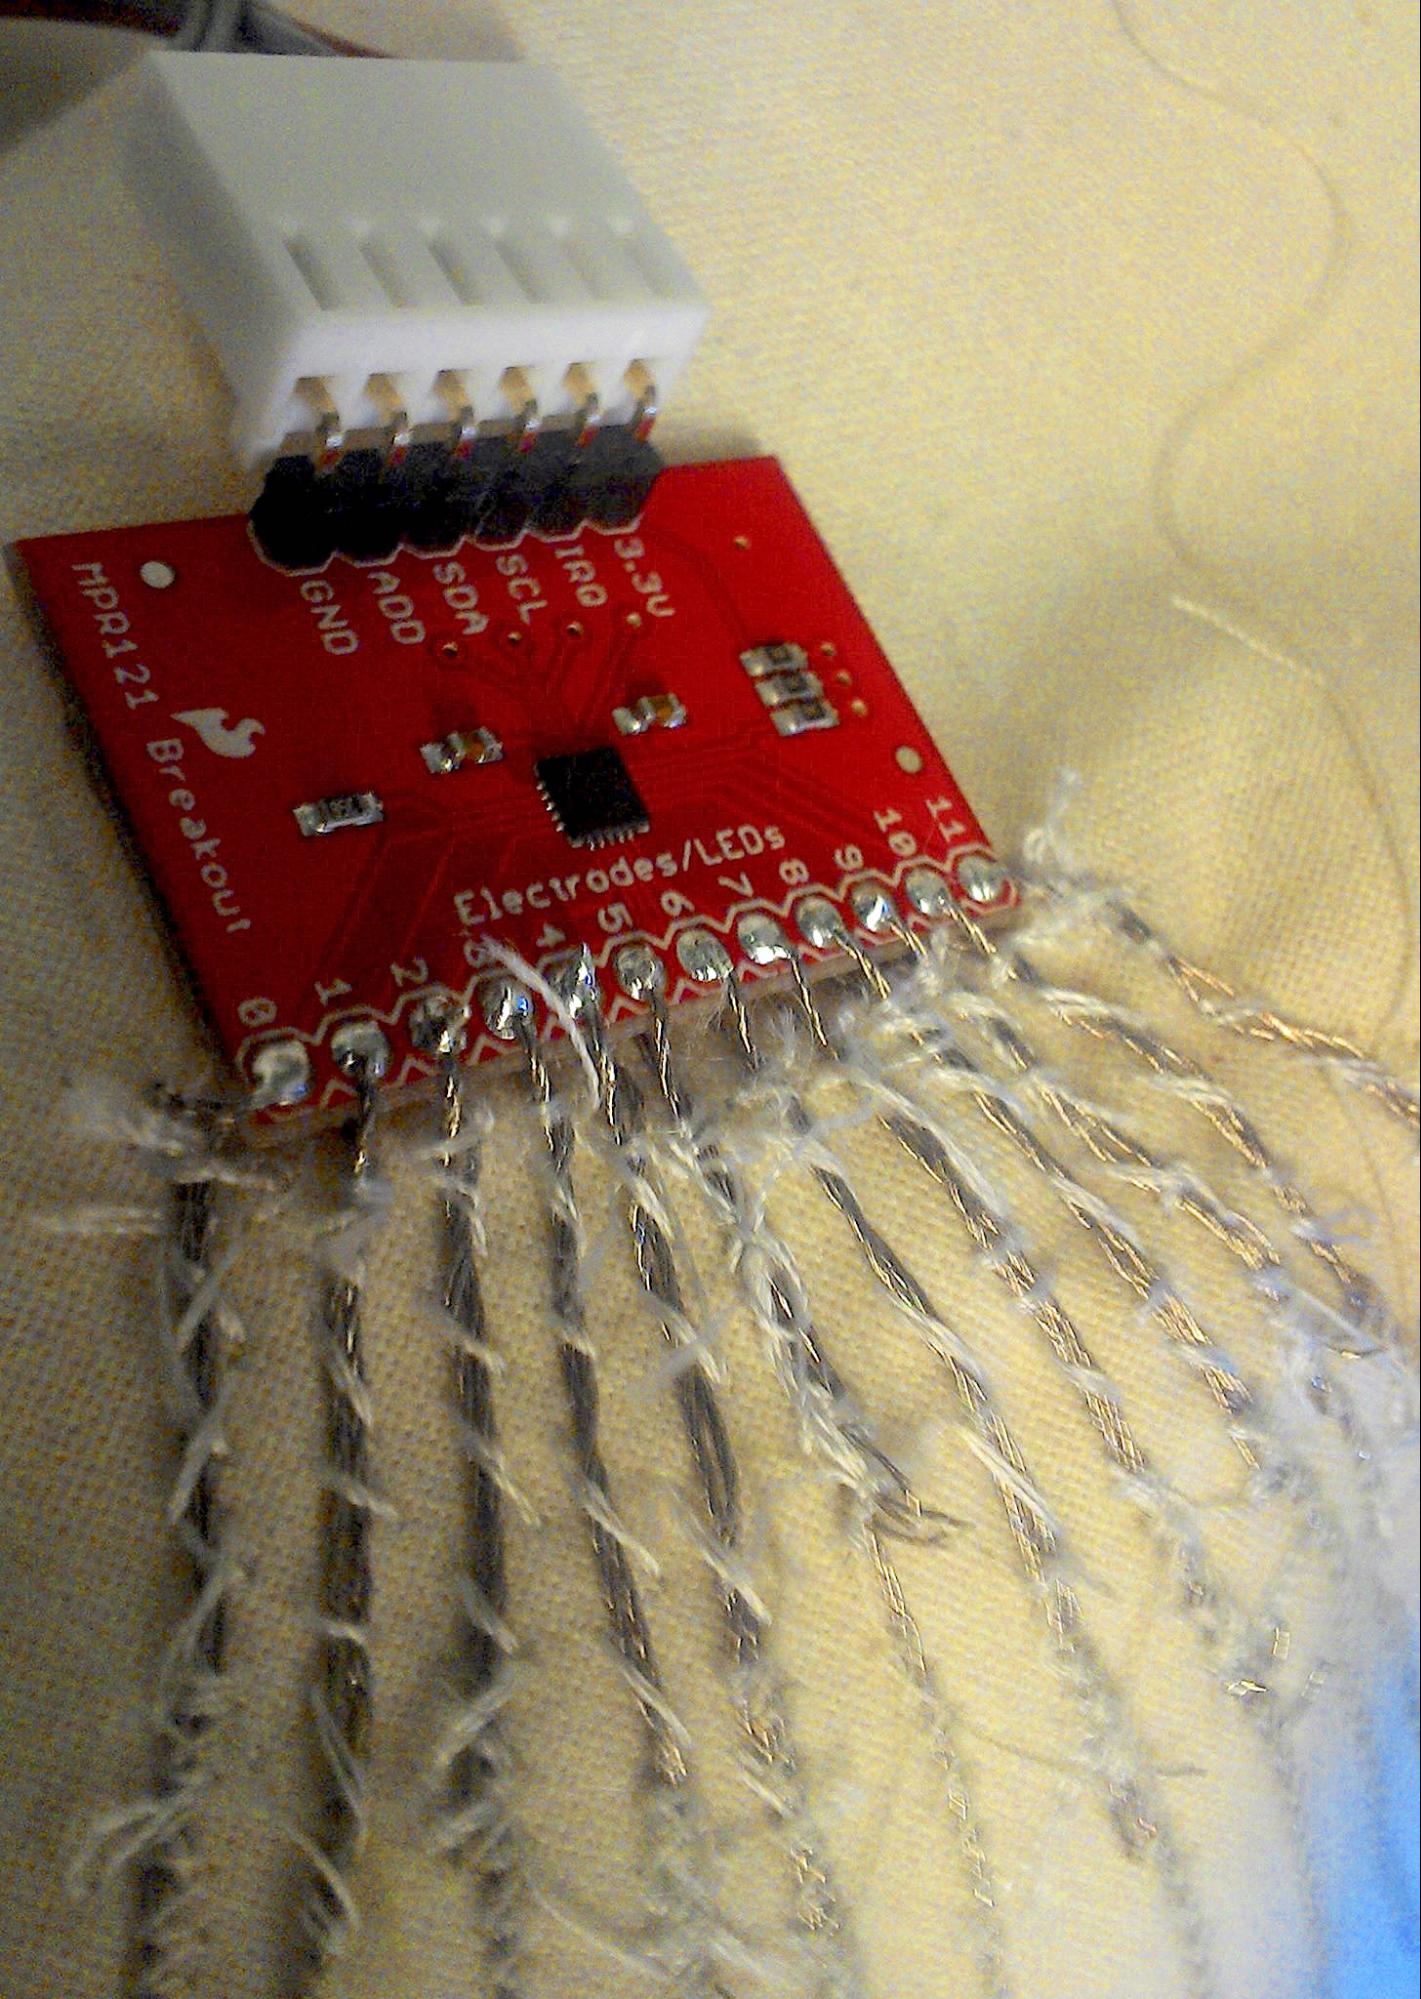
Detail of MPR121 breakout board with the passing wire soldered and sewn between the board and the threads traces.
Here are some pointers that came from the process of working with the conductive thread:
- Two traces should never be too close to one another or they will trigger false readings by shorting together.
- A multimeter comes in handy to verify the continuity of the circuit. In order to avoid wasting time and material, it’s alway better to check for continuity on some samples before embroidering the final one as the particular materials and threads in use can behave very differently.
- Be patient and carefully design your circuit according to the intended position of the capacitive boards. For example, I decided to place the two of them (to allow for 24 separate readings) in the top corners of the fabric.
Connecting with Bela:
The two breakout boards are connected through i2c to Bela which receives the readings from each pin of the breakout boards. The leftmost is connected through i2c to the other one, and this one goes to Bela. This cable is the only connection between the Fabric and Bela. It is possible to set an independent threshold for each pin, which will trigger the index releasing the correspondent recording. The code used to read the capacitive touch breakout board comes with the board and can be found here: examples/Sensors/capacitive-touch/.
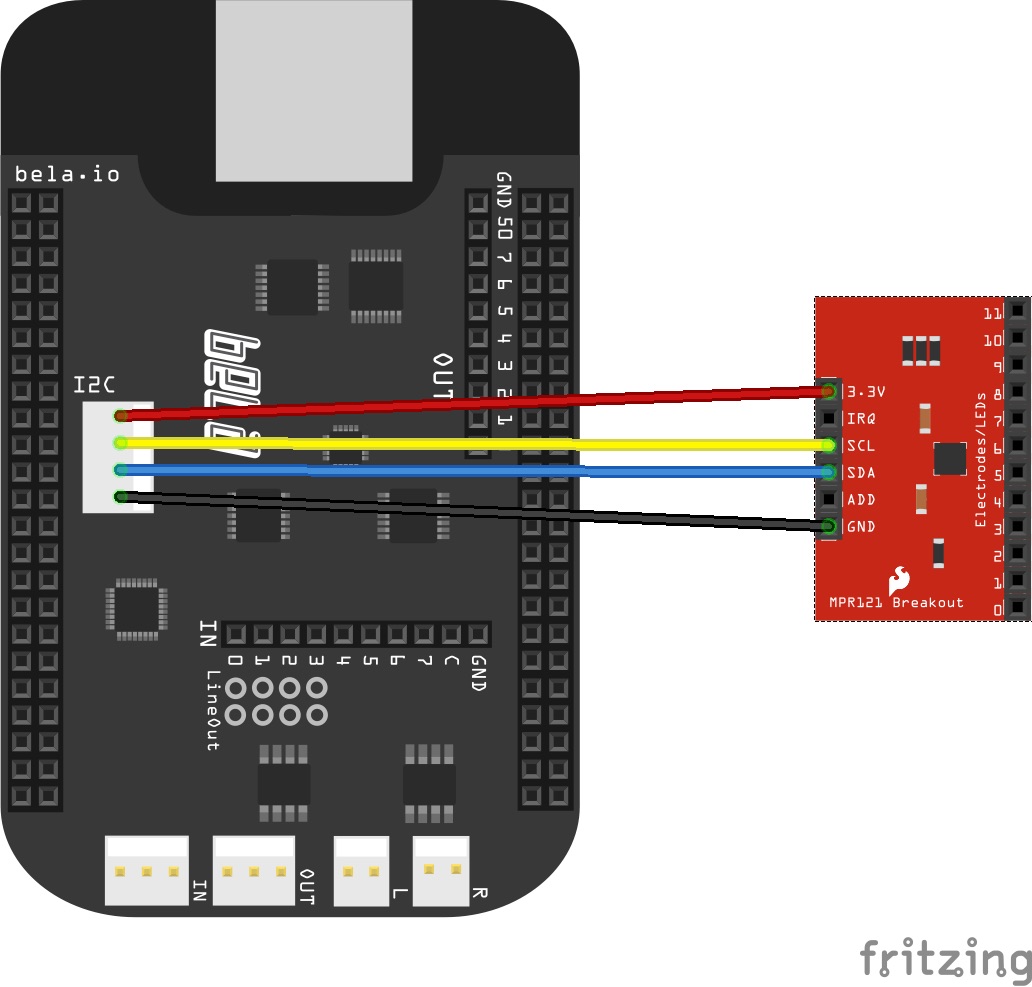
MPR121 capacitive touch sensing breakout board connected to the i2c terminals of Bela.
The code to handle the recordings was nicely tweaked by Christian Heinrichs to add a natural fade in and fade out for the recordings. This code is based on the multi sample streamer example already available in Bela’s IDE which can be found here: examples/Audio/sample-streamer-multi/. Each recording has a pointer that keeps track of where the recording paused, so that touching the corresponding area again will resume playing from that point and not from the beginning. Multiple areas can be played at the same time allowing you to create experimental mixes of different ambiances.
Exhibition setting
This piece is best experienced through headphones as the recordings were made using binaural microphones, nevertheless it is also possible to use speakers, with some loss of the spatial sonic image fidelity. In either case the audio output is taken directly from the Bela board. In the photograph below I made a wooden and perspex case for the board to protect it while it was installed in a gallery and powered the board with a USB 5V phone charger. Bela was set to run this project on start-up making it simple for gallery assistants to turn the piece on and off. The Aural Fabric is currently being used for my PhD research, focused on novel approaches to strengthening the relationship between architecture and acoustics. At this current moment I’m aiming to engage architecture students in sonic explorations and reflections on how architecture and its design contributes to defining our sonic environments.
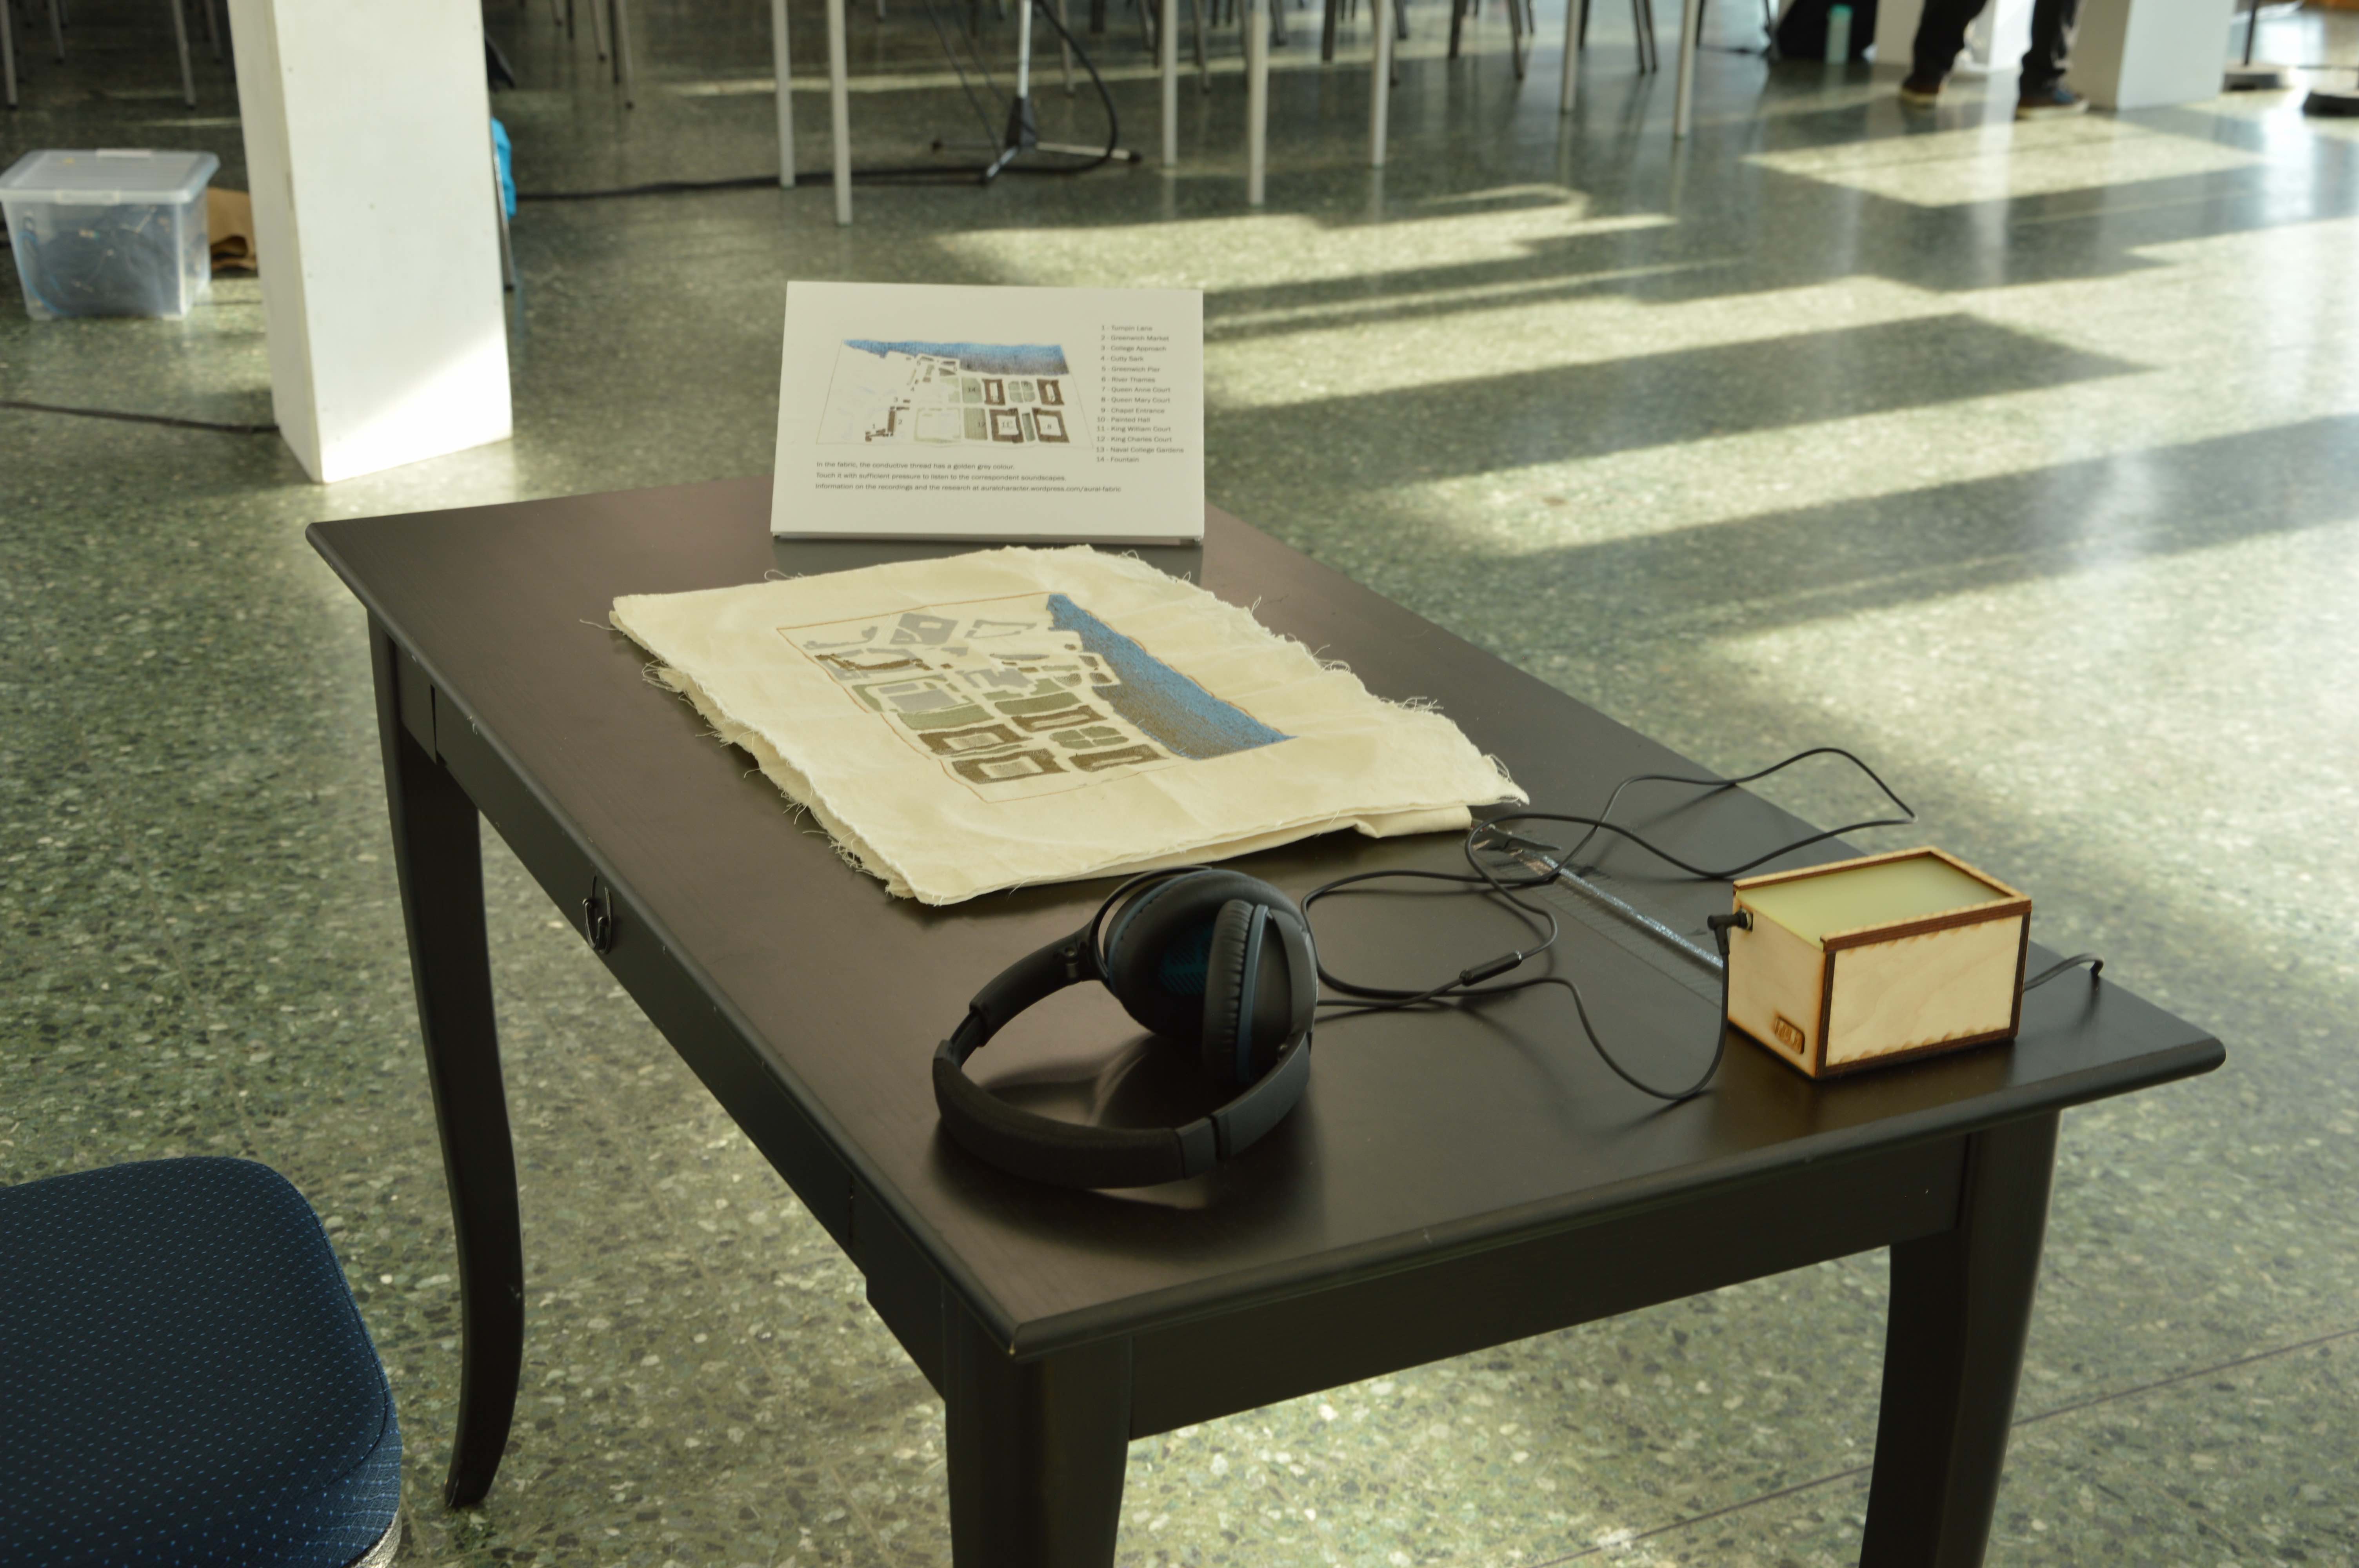
Aural Fabric at Inter/sections 2016.
Aural Fabric: Greenwich has been displayed at Sonic Environments in Brisbane among the installations and Inter/sections 2016 in London. More information documenting the making process is available here. If you’d like to hear more about its development or you’d like the fabric to be shown or used please get in contact below.