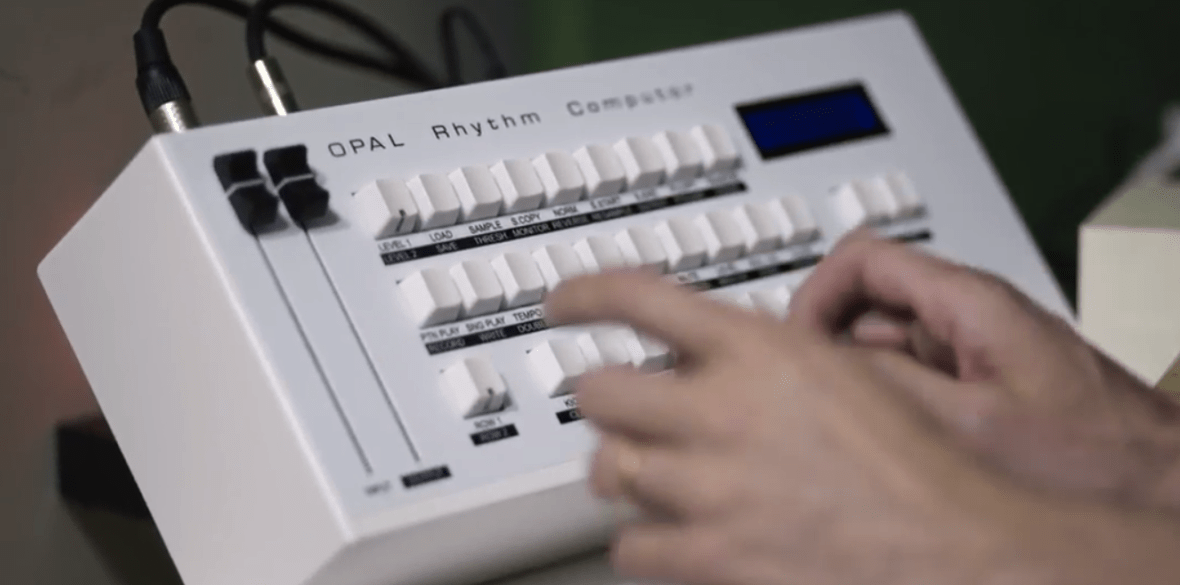
Opal Rhythm Computor by DMX Krew
A drum machine and sampler
In this post Ed DMX (AKA DMX Krew) talks us through the Opal Rhythm Computor, a drum machine and sampler that Ed built from scratch using Bela.
Ed showcasing the instrument in an interview with FACT magazine.
The Opal Rhythm Computor
Under the name DMX Krew, Ed has been a stalwart of the British DIY electronic music scene for the past 25 years. Continually producing and releasing music over this period, his work has been released on Aphex Twin’s Rephlex label, and his own Breakin’ Records and Fresh Up Records. In this post Ed talks us through the reasons that brought him to recreate a RSF SD140 sampling drum machine. Having never built a circuit, soldered or programmed before, Ed also guides us through his first experience of building his own music hardware from scratch. This includes coding the behaviour of the instrument, interfacing with buttons and screens, soldering everything together and designing an enclosure to house the instrument, ready for the road. Over to Ed to tell us more about this great project.
Inspiration
In the 90s I had an S950 and everything I sampled came out sounding different to what went in. I was desperate to get a sampler that sounded clean and lifelike, and eventually I spent a huge amount (for me) on a secondhand Kurzweil K2000. It’s still the most expensive thing I’ve ever bought for my studio and it’s now worth far less than synths that cost me under £100 during the same period. A few years later I got my first MPC2000 and instantly loved the concept of an integrated sampler and sequencer, especially for drums, but I still never got why you would want a sampler to colour the sound in any way. The first time I heard aliasing from a sampler was when Bass Junkie brought his EIII to my house to mix tracks like this.
10 years later I had read the internet hype about SP1200s, MPC60s and so on, and Aphex Twin had told me about the RSF SD140 that he used on most of his early tracks. I came across a damaged SD140 that I manged to buy very cheaply. Straight away I fell in love with the grungy sound it made, and I made some records with it like these:
The sound was amazing and gritty, and the user interface was extremely simple and quick to use, much faster than an MPC. I could easily make Aphex weirdness or very authentic Prince-style Linn sounds. Unfortunately mine only had 6 of the 14 sound memories working - either the PCB was damaged or the ancient PRAM chips had died. After a while I discovered there was one repair guy in France called CEM3374 who specialised in fixing RSF gear so I sent it off to him. After a few months he stopped replying to my emails and I never heard from him again. He stole my SD140 and I couldn’t find another one anywhere. There didn’t seem any point flying to France to confront him when he had probably long since sold it. Instead I tried a lot of experiments with the bit grunger effect on the MPC1000, and I bought an Eventide DSP4000 and made my own bit crunch and sample rate reduction programs on it, in an effort to recapture the SD140 sound which you can hear in the video on the left. In the video on the right you can also see what the SD140 looked like.
Although I discovered some cool sounds, it wasn’t much like the SD140 and besides, it’s a real vibe killer to have to run each sound through an effect and tweak it each time instead of just turning on the machine, sampling some sounds in a matter of seconds, and having them instantly sound like magic.
As I was giving up hope of ever finding another SD140, I saw a post on Facebook about a Kickstarter project called Bela. It seemed to be an accessory for a small computer called the Beaglebone Black, which provided lots of digital, analogue and audio inputs & outputs, and enabled the user to compile Pure Data patches and run them with the very low latency necessary for a satisfying musical instrument. So I got the idea: maybe I could learn to make my own drum machine with the aliasing sound and the lightning-fast interface I loved from the SD140.
Taking the plunge with Pure Data
I knew nothing about programming or electronics but it sounded almost like something I could manage if I was prepared to be very patient. I had done some of my own visuals for my live shows using Quartz Composer, and Pure Data seemed to be a similar graphical / dataflow kind of programming environment that I thought I might be able to learn. I decided to download Pure Data and see if I could get the hang of it. If I had some success then I would support the Kickstarter and order a Bela & BBB.
The first few days with PD were very very slow and I almost gave up. Every sentence I read of the online guides assumed programming knowledge that I didn’t have. I had to Google almost every term I came across just to understand the absolute basics of how to get started. However, once I had a grasp of the concepts, I looked at some drum machine examples others had made and started adapting things to make my own. The PD forums were extremely helpful both at the beginning and throughout my journey. My first drum machine in PD used the basic graphic interface to allow 808-style grid programming of a few DMX sounds. It was ugly and simplistic but it worked. I added a couple of features like tuning of samples, accent levels for each sound, and pattern swing, and suddenly it began to sound pretty good!
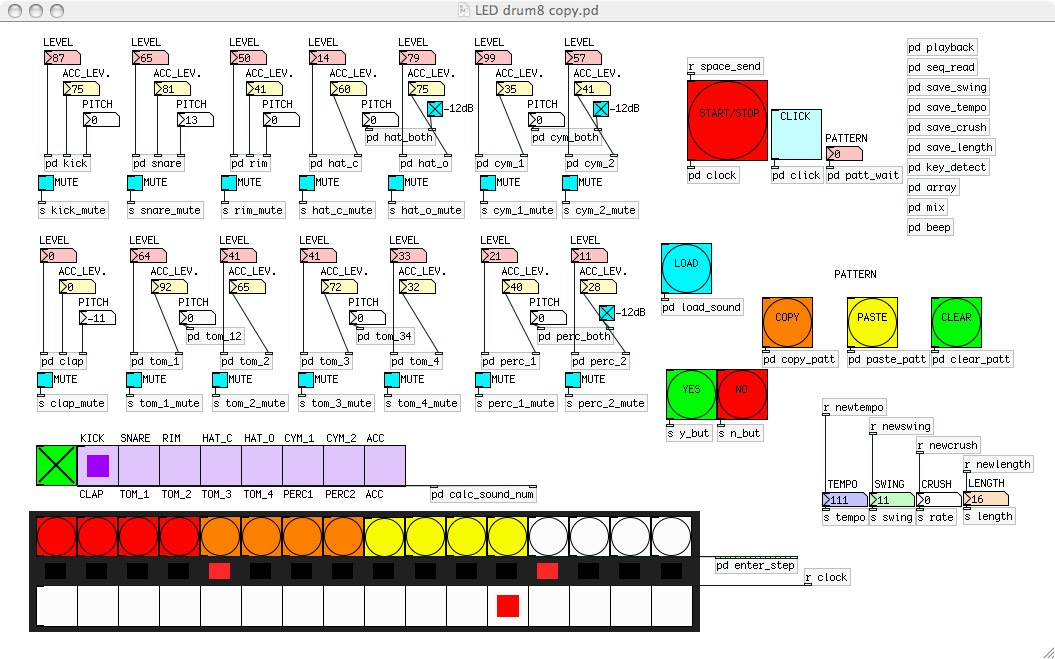
I took the plunge and pledged my money to the Bela Kickstarter. It was a few months until the unit would arrive so in the meantime I could work on the software and start having ideas about the hardware. I wanted the hardware to be simple to make so I decided on buttons only and a simple display. I modified my PD drum machine so that all the functions were accessible from on-screen button pushes and editable with UP / DOWN / ENTER buttons. There would be two functions on each button and a shift key, but no menus, so every function could be reached quickly, exactly as on the RSF SD140. I added MIDI, sampling, and a convoluted way to edit the sample start & end times by copying them to an edit buffer. Around this time, I used the software I’d made on a couple of tracks that are out now:
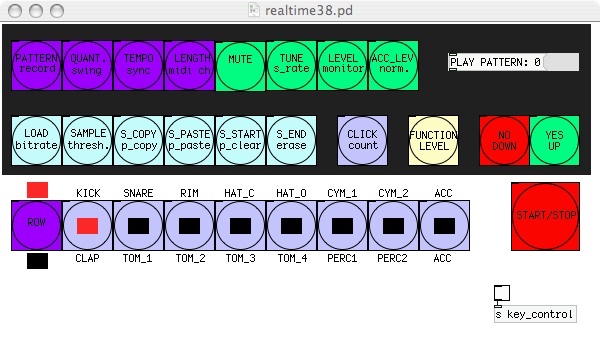
I realised I couldn’t afford to have such a huge amount of buttons and LEDs on the real device so I decided on a real-time system of tapping in rhythms as on an MPC or LinnDrum. I prefer this to 808-style anyway – I am a musician, not a data-entry technician. I wanted to allow the user to set the amount of quantisation, or to leave notes unquantised, which meant I needed to create an entirely new data structure for the sequencer called a linked list. This was all new to me and I found this part extremely hard to program. It took weeks of attempts plus several days of solid concentration to get it to work.
First Adventures in Hardware
Once the Bela & BBB arrived the next part of my learning began. I had to figure out how to make my Pure Data drum machine accept input from physical buttons. I was such a beginner I had to discover ultra-basics like what a breadboard is and how to connect the BBB to the breadboard or a circuit board. I spent days researching about ribbon connectors and cables. I think this kind of knowledge is assumed to be so basic that it is almost impossible to find out if you haven’t got someone to ask. In the end I settled on these:
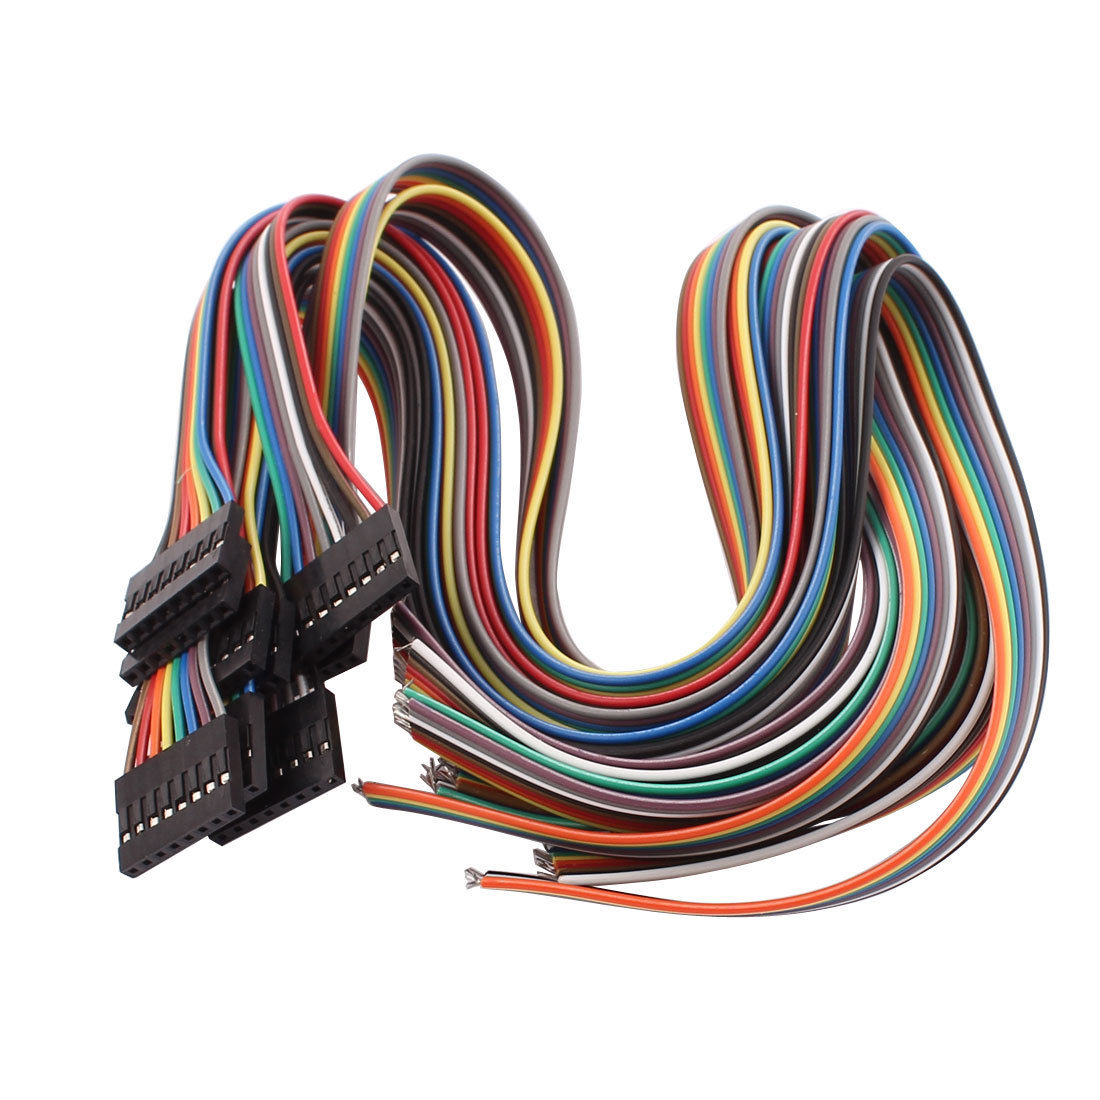
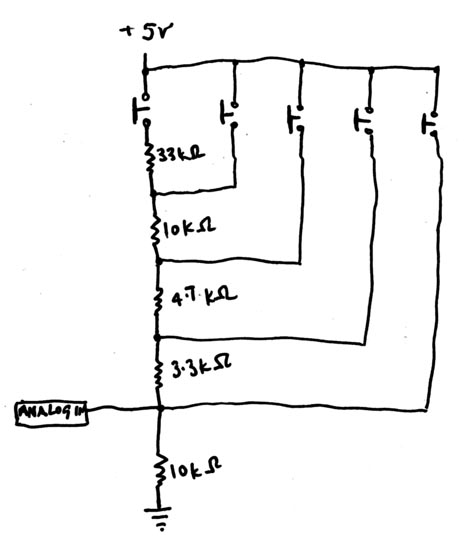
On the left the jumper cables used. On the right the schematic for the switch tree.
I looked at some beginners’ electronics projects online and bought some parts from RS & CPC. I managed to get the BBB to turn on and off LEDs by using tact switches connected to the digital inputs, but there weren’t enough inputs to let me connect all the buttons I needed and the buttons often double or triple triggered. So I went back to Google and discovered debouncing and figured out a way to do it within PD, avoiding the need to add more components than the bare minimum. I decided on a switch tree arrangement to facilitate the large number of buttons required and built the circuit on a breadboard. I found I could reliably have 5 or 6 switches on a single analogue input using this method, so I could incorporate all the buttons I needed using 5 analogue inputs and 10 digital inputs. I used one of Bela’s digital inputs for each of the keys that trigger the sounds because I thought these were the most critical as far as accuracy and timing were concerned.
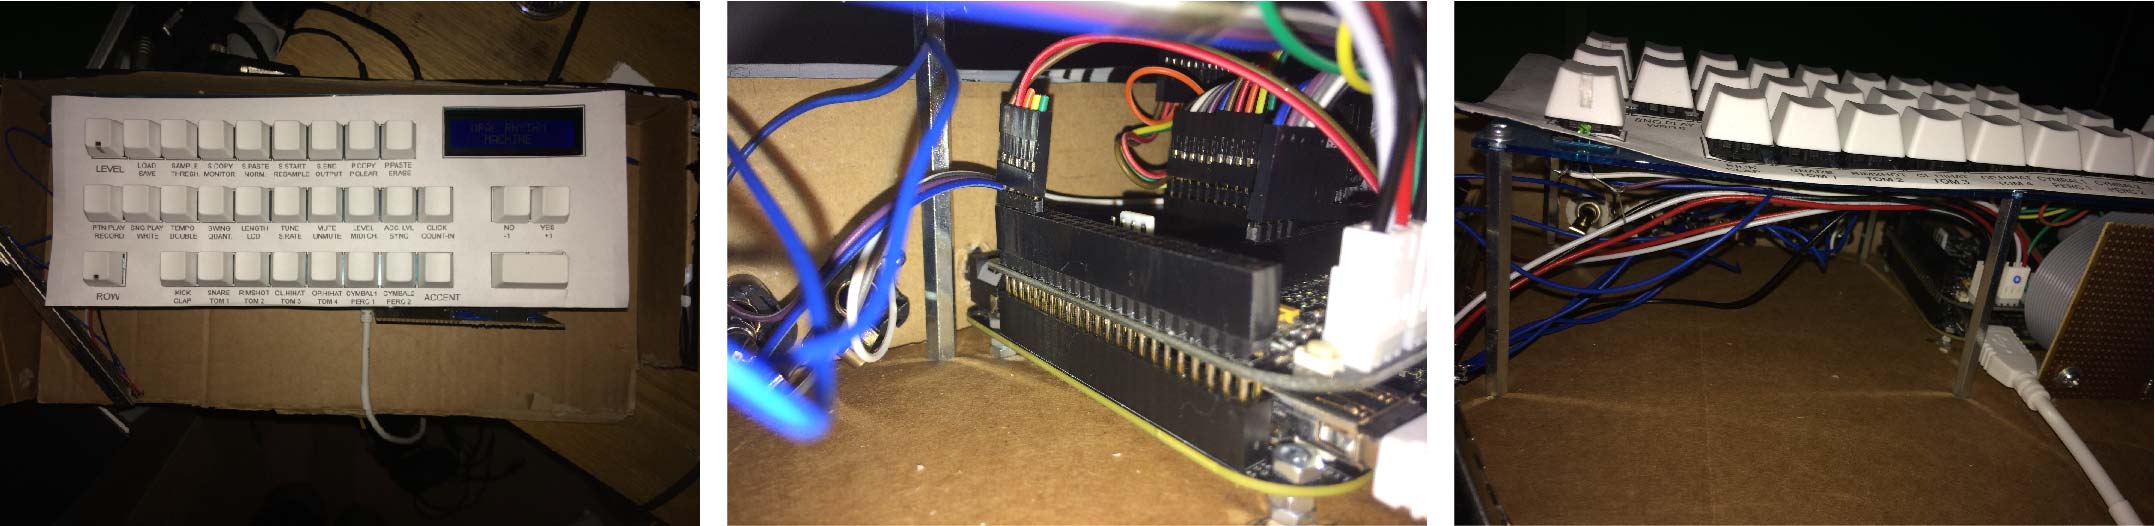
Next I discovered perfboard, and designed a layout for the circuit and soldered it together. The first bits of soldering were very messy and amateurish and, while I am still not great at soldering, I gradually got the hang of it as I went along. I had to redo a lot of it and trouble shoot many times because I had accidentally soldered two tracks together, or failed to solder a connection at all despite using huge amounts of solder.
Buttons
I didn’t like the feel of the tact switches I was using and I missed my old TR-909 so I decided to buy some mechanical keyboard switches. I went down a big rabbithole of websites about making your own keyboard, mostly for people who are into computer games and want a custom layout with fast keys. I learnt all about the various kinds of Cherry MX keys, bought a few and tried them out, and settled on Cherry MX Brown. I used a website to design a keyplate layout and had a local guy with a laser cutter cut out a keyplate from acrylic.
By this time I was reasonably OK with the soldering iron but hand wiring the keyboard was the biggest and hardest soldering job I have ever done. It took a few hours and over the following months it had to be repaired many times as assembling and disassembling the machine took its toll. But finally I had a working keyboard and would be able to map each key to one of the on-screen buttons in my PD drum machine once I had the display working.
Display
The SD140 has a 2-digit 7-segment LED display but I decided on a design upgrade and bought a backlit 2x16 LCD from Amazon for about £2.50, called an HD44780. I had to figure out how to get PD messages to appear on the screen. There are various libraries out there for these displays, but in order to use them I would have to compile my Pure Data code into C and then work out how to incorporate the LCD library into my code. As you can tell, I still don’t even know the correct technical terms to describe what I was trying to do. I downloaded a book about C programming and I asked lots of question on the Bela forum. Giulio Moro from the Bela team was very helpful but his answers were often quite technical for me.
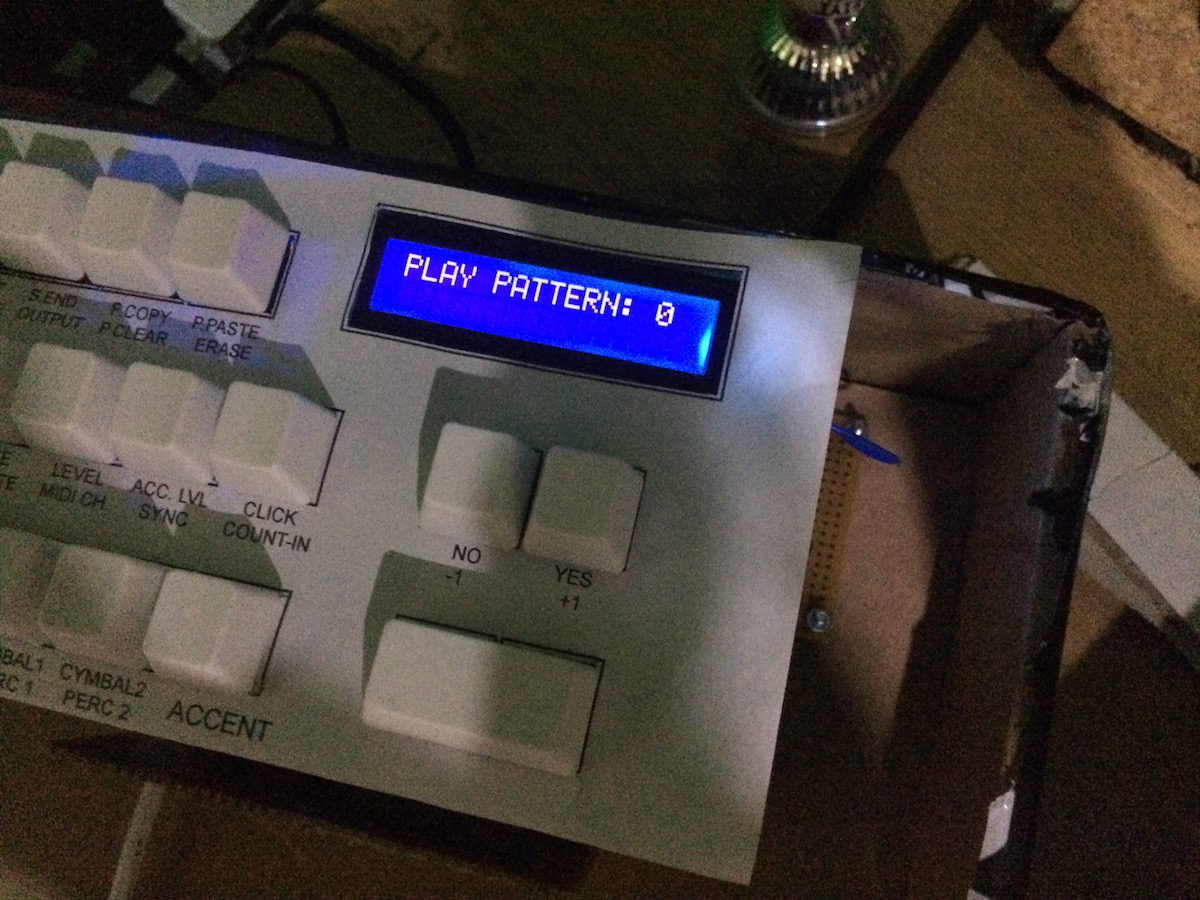
After a week or so I calculated that it would be quicker for me to write my own LCD drivers in PD. This is probably an insanely inefficient thing to do but it made sense for me working alone, so I did it. It took a while because the LCD inputs are extremely time-sensitive - you have to send the data in the right order with the right-length gaps in between. Eventually I was able to display a few words but the display would often start showing garbage or go blank. It took a couple of months to get the LCD fairly stable whilst working on the keyboard during the same period. I used 6 of Bela’s analogue outputs to control the LCD, simply because it needed 5V and the digital lines are only 3.3V. I didn’t want to risk mixing 3.3V and 5V on my LCD board in case I messed up and fried the Bela.
Once the screen was mostly working, there was a lot of programming to do to port the whole thing over from working with a monitor and mouse, to working in the embedded environment that I had created. After soldering some nice long slider pots and some quarter inch jacks to the audio cables that came with Bela, I was finally able to hook all my messy little circuits together with my home made keyboard and the BBB/Bela and the LCD. I had the whole lot sitting in an old cardboard box and it looked mad but it kind of worked! I stuck a piece of paper over they keys to tell me what they were supposed to do.
The screen still bugged out a lot and I had to add a “reset screen” function. It would take more months and a lot of help from Giulio before I finally got to the bottom of the problem, which was to do with the block size in PD and its effect on the timing of events. I had to add a lot of safeguards to stop data arriving in the wrong order or too quickly for the LCD to interpret it. It really tested my patience and resolve! Worse, the sound was badly glitchy and I realised that the unquantised sequencer based on linked-lists was just too computation-heavy for Bela to be able to run it and still generate sound correctly, at least given my inefficient choice of using PD for everything. So once again I re-wrote the whole sequencer for realtime entry but with automatic quantisation, meaning the code was much simpler and the memory used for storing sequences much smaller. I also dropped the realtime sample-rate reduction feature since you can still get low sample rates using the resample button, and optimised everything else as much as I could. After that it started to work pretty well!
Audio and MIDI Connections
I wanted to have 4 audio outputs rather than just stereo so I used the 2 remaining analog outs on Bela for audio. These have the quirk of being sampled at 22kHz which is a bit lo-fi but I really like how they sound. I went back to the internet and learned some equations about AC coupling and bought some supposedly high-spec capacitors from a hi-fi place. I tried a few out until I liked the sound I was getting. The extra outs are louder than the main outs which helps fight against noise.
I decided the simplest way to implement hardware MIDI would be to get a small USB MIDI interface and just put it inside the drum machine with 5-pin din connectors on the back panel. In doing this I discovered that some MIDI interfaces that are sold as “class compliant” actually aren’t - I lost a lot of time with a MIDIsport unit that couldn’t receive MIDI clock messages. Finally I settled on a Ploytec board that did what it was supposed to and took up very little space.
Enclosure
During this time I had spent a lot of time browsing the internet for ready made enclosures, thinking about woodwork & metalwork, and looking at the various old computers, toolboxes and pieces of furniture dumped on the streets of east London as I walked around. But by this time I’d worked for a year on my invention and had lost count of the money spent so I decided to shell out and get a proper case made. I worked out that one way to build the thing would be to mount the BBB and all the circuit boards on a sheet of aluminium and then mount the aluminium inside the case, so I bought some from eBay along with a centre punch and some good drill bits, and found that it’s pretty easy to work on.
Due to the cables and the need to make it possible to get fingers inside to assemble the whole thing, I had to make the case a bit deeper than I would’ve liked but it still looks nice. My friend Dave from RaingerFX put me in touch with the company he uses to make cases for his pedals and gave me some tips on how to lay it out.
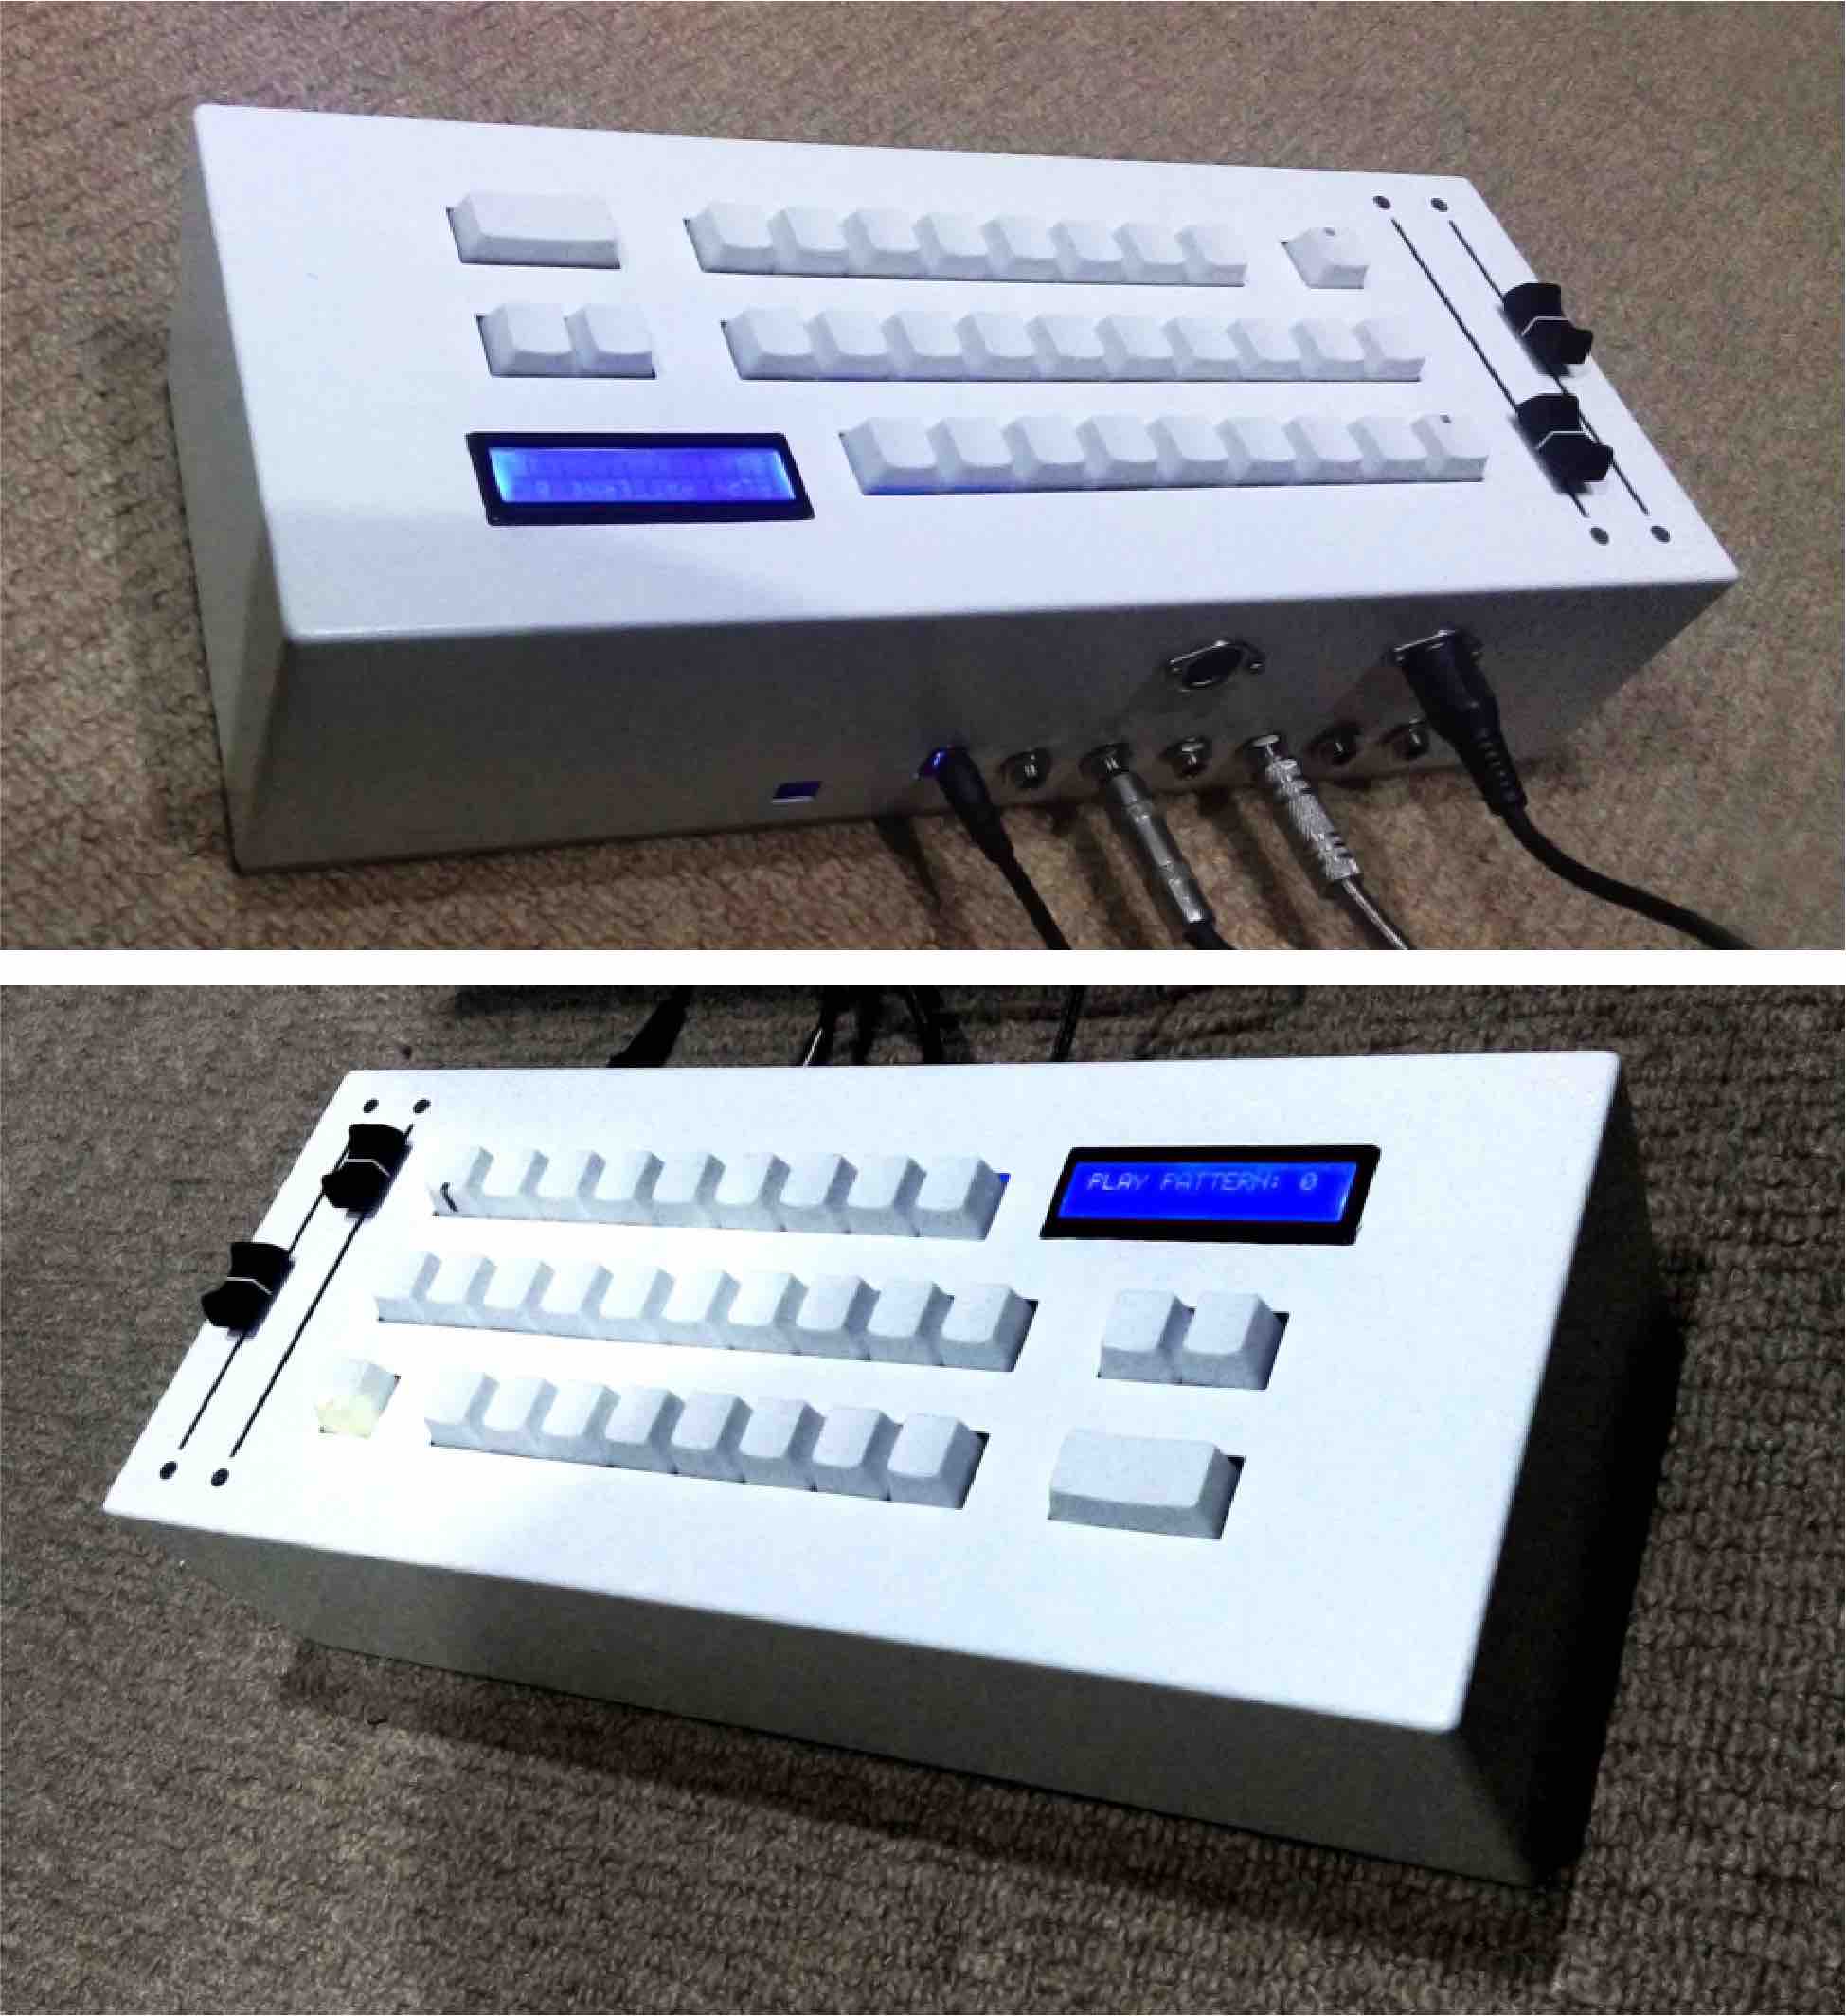
I made the layout in InDesign and printed it out and built it out of paper to check for mistakes. Then I did it again until it was right, and sent it off to Perancea. They made the box and sprayed it white for me. Somehow it came with the hole for the screen in the wrong place (their fault not mine) and I had to do quite a bit of filing to get everything to fit inside (my fault not theirs). I used some 3M double-sided adhesive to keep the screen in place until the case was screwed together.
And then it was bascially done. It was a big buzz to have it all assembled and working!
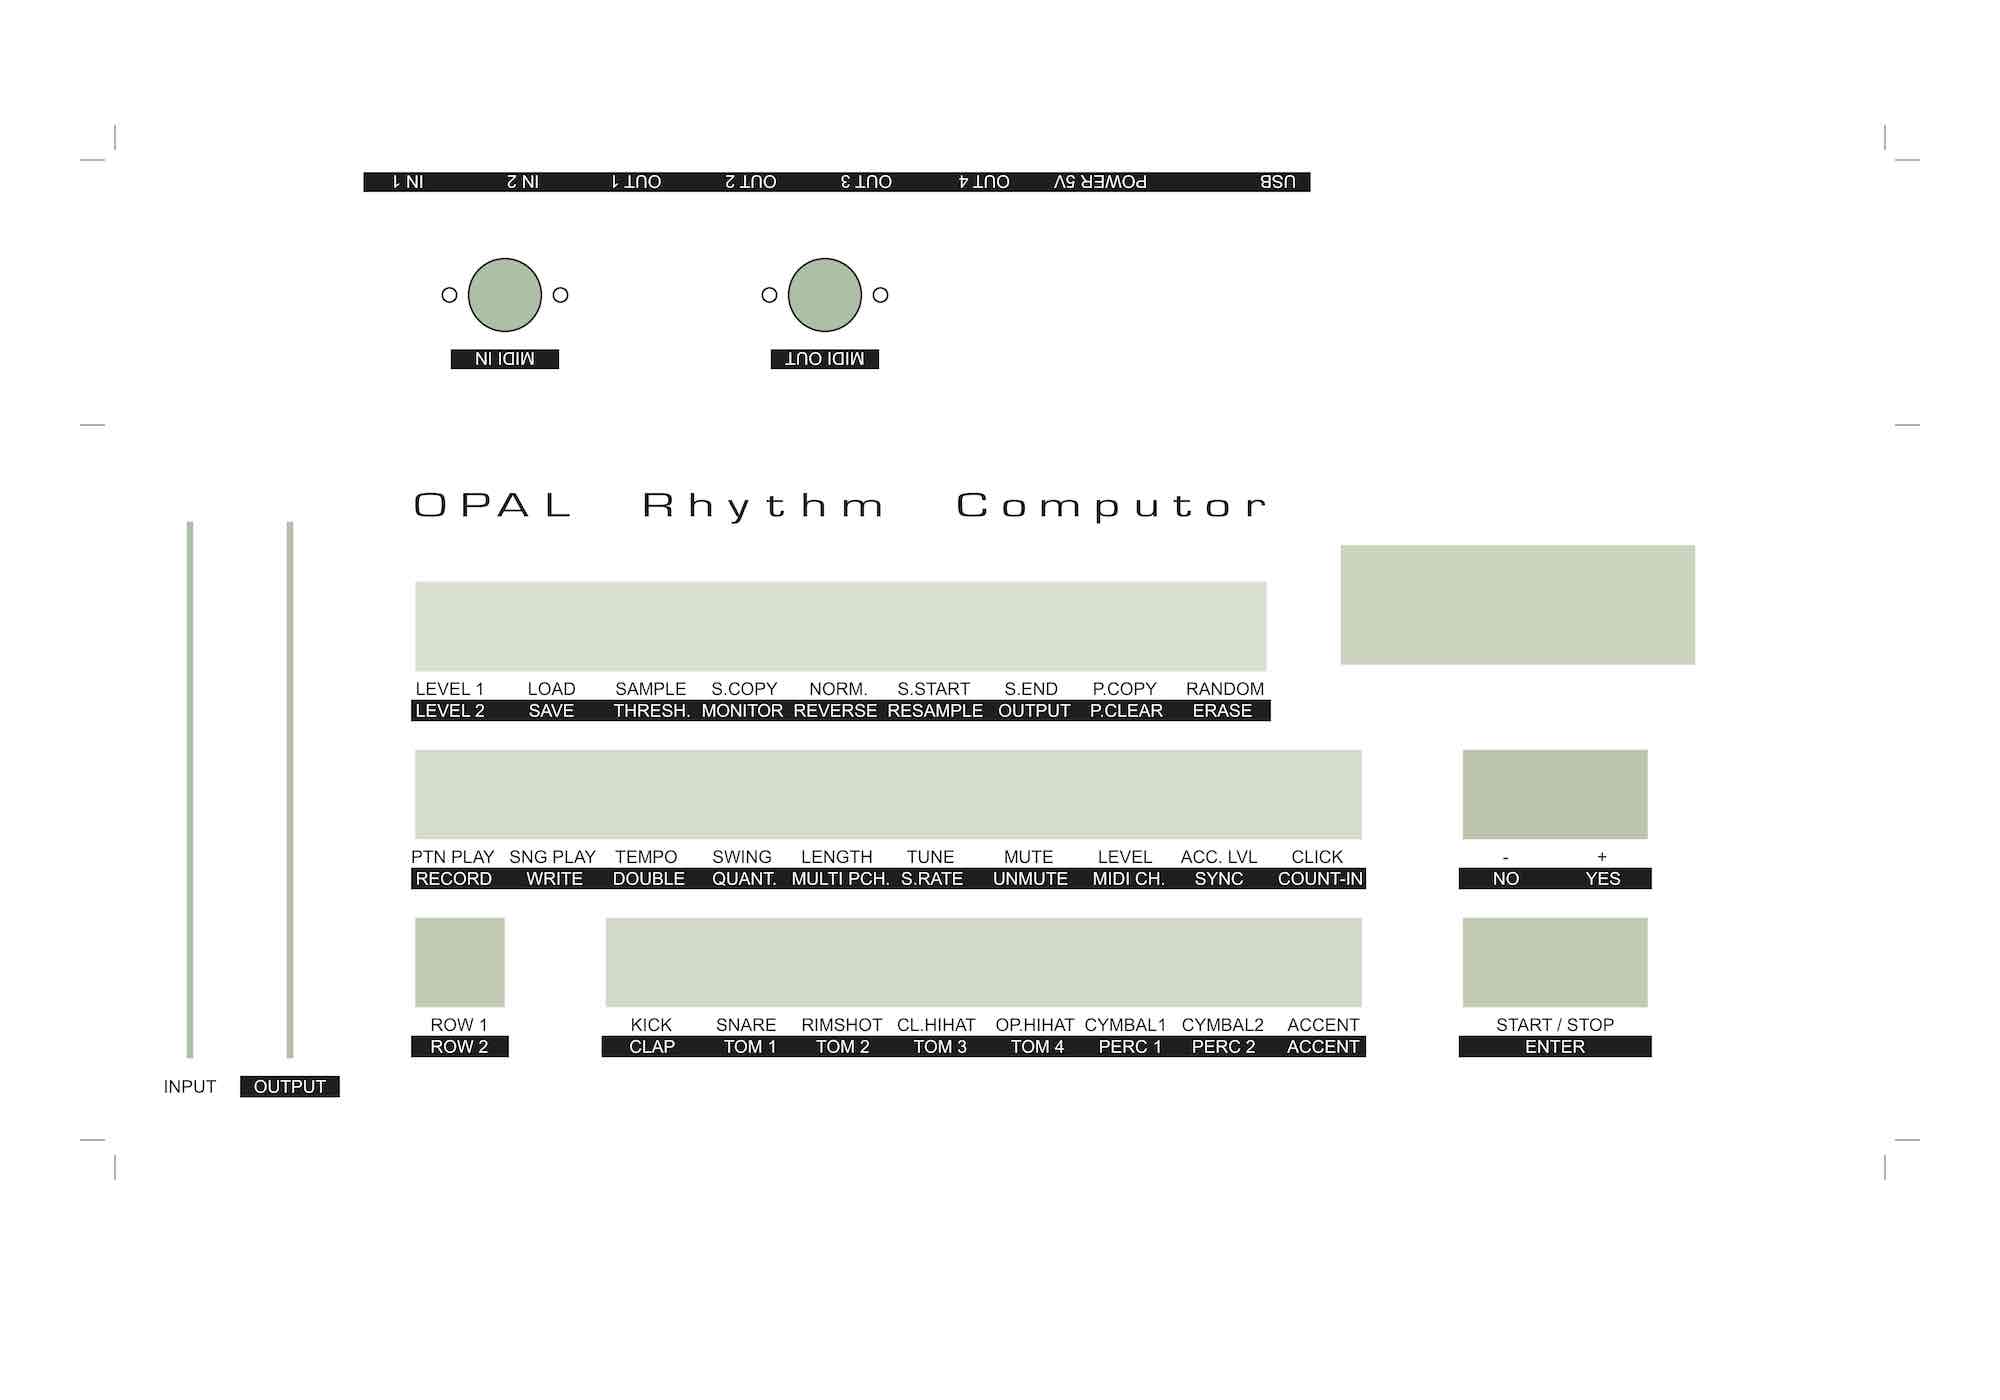
The Final Instrument
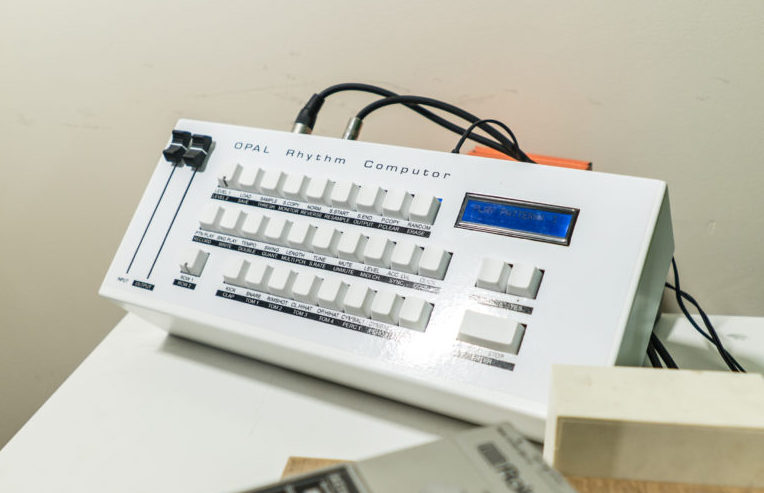
The Opal Rhythm Computor
I had several more software revisions to do to stabilise the screen more and streamline features such as copy & paste. There was a bug that made sync from external MIDI devices lag by a few miliseconds which took a long time to find. At the last minute I added proper editing of start and end points for each sample and a “randomise pattern” feature suggested by a couple of friends, which uses an algorithm to create semi-random variations from a pattern.
And of course, since there is a USB socket on the back that lets you connect to a computer and update the software that is being run, what I have actually built is not just a drum machine but a hardware box that can run anything you care to program in PD. So in the future I might write firmware for an effects unit or a synth…. I’ve got a good idea for a synth but I think I would like the hardware to have at least one encoder!
Just as I was finishing my project, Aphex Twin offered to sell me one of his spare RSF SD140s. I thought about it and decided that I prefer the one I made myself :)