Using an external library within a Bela project
Learn how to super-power your project with packaged code
When writing a computer program, most of the time you do not have to write all the code that the program needs, but you will rely on parts of code written by others, often packaged in the form of a library. For instance, you rely on libraries every time you print a line of text to the console, or read a file from disk.
Bela is a full-fledged Linux computer and a Bela program is no different from a standard Linux program so in principle you can access any library that is available on Linux from within your Bela project. In this tutorial we will see two examples of how that can be done.
A word of warning
While you can use standard Linux libraries with Bela, you should be careful about using calls to these libraries from within your Bela audio code.
As a general rule, you should not use in the audio callback (e.g.: Bela’s render() function) any functions or methods that have an unbound execution time, for instance: functions that may perform system calls, or memory reallocation, or algorithms that do not have a constant complexity. Here is a more exhaustive list of things you should NOT do in the audio thread.
NOTE: some of the steps below will require your BeagleBone to be connected to the internet. The most straightforward way to do so is connecting it via the ethernet cable to a home router. Other options involve wifi dongles, or sharing your computer’s connection over the ethernet over USB connection. The latter is very much depending on your host operating system, so just google it.
What is a library?
The internet is full of answers to this question, we very briefly review here some basic concepts.
“a library is a collection of non-volatile resources used by computer programs”
Practically speaking, a library may contain a toolkit for a specific task, for instance to read and write sound files, or to access web services, or to perform machine learning or signal processing tasks.
Libraries are usually composed of one or more header files and one or more pre-compiled binary files.
The header files are used by your .c or .cpp files to know about the existance of classes, methods, functions, variables, so that they compile correctly.
The actual pre-compiled binaries that make up the library are only needed at linking time, so that the linker can find the symbols.
How to use a library on Bela
In order to use a library in a Bela project, you first have to install the library, then #include the appropriate headers in your source files and - last - make sure that the linker links it in.
How to get it
Using apt
Bela runs Debian (a distribution of Linux), which comes with apt, a command-line package manager which can be used to install a large selection of pre-compiled libraries.
If your library is available for Debian throught apt, then installing it will require a few easy steps. Note that you will need to be connected to the internet and run apt-get update before you go through the following steps.
You need to find the name of the package that contains the library. A good guess, which works most of the time is libLIBRARYNAME-dev. Alternatively, you can google for “LIBRARYNAME debian”. A more “scientific” approach to this is to use apt’s own search tool:
apt-search LIBRARYNAME
(may take a while), then choose from the list of packages that it returns the one that is most suitable.
Once you find out the package name, you can install it with:
apt-get install PACKAGENAME
Without apt
There are many cases when the library is not available through apt, or apt is providing an older version of the library.
In these cases the libary developers/maintainers may provide a binary compiled for ARM Linux hard-float (Bela’s architecture).
If this is not the case, then the last resort may be to compile the library from source yourself.
The complexity of this task may range from very easy to very hard, depending on the library’s documentation and maintenance. In many cases, the developers provide a set of step-by-step instructions on how to build the library and a list of its dependencies. If this is the case, the instructions are working and up-to-date, and the dependencies are easily available, then building the libary from source may require copy/pasting a few instructions and wait a couple of minutes. Unfortunately this is not always the case, but it is always worth giving it a try.
How to use it
By now you should have your library on the system and you want to use it in your project.
Include it
You will have one or more source files that need to know about the library’s API in order to be able to use it. For instance, the compiler needs to know that a function or a global variable is defined somewhere else, otherwise it will throw an error.
Remember what the compiler needs to know, for example: what methods a class has, how much space in memory an object will take, what global variables are defined, it needs to know about the interface of the library, which is usually specified in a header file with extension .h, provided as part of the source code of the library.
In order to make the compiler aware of the library, you would then have to use the #include preprocessor directive at the top of any source file that needs to know about it. Again, the library documentation should tell you what files are to be included, as there may be distinct header files for distinct parts of the library.
Anyhow, a good starting guess is:
#include <LIBRARYNAME.h>
but you should check the documentation if this does not work as expected.
The angled brackets (<...>) notation used for #include means that the compiler will look for a file with that name in the include search folders. By default, these typically include /usr/local/include and /usr/include (and /root/Bela/include for a Bela project!). Any library installed via apt-get will probably add their header files to those same folders and as such it should work out of the box.
If you built the library yourself and you skipped the install phase (or this facility is not provided by the library builder), then you locate the header files for the library on your disk and tell the compiler about it.
This involves adding the folder containing the header files for the library to the search folder of the compiler.
This is specified by the -I/path/to/header/folder flag passed to the compiler.
To pass options to the compiler through the IDE, you have to use the “Make parameters” box and set the CFLAGS or CPPFLAGS parameters (depending on whether you include the headers from within a C or C++ file, respectively )accordingly.
For instance, in the example above, if you have a C++ file which includes the file LIBRARYNAME.h and the file is located in /root/LIBRARYNAME/include, then you can type the following in the “Make parameters” box in the IDE:
CPPFLAGS=-I/root/LIBRARYNAME/include;
Link it
The last stage of the build process is the “linking”, where the linker collects all the intermediate object files generated by compiling each individual source file, resolves external symbols (including the ones belonging to the library!) and produces your executable binary output file.
You must tell the linker you want to use the library, so that it knows it should look into it for any unresolved symbols.
In order to do so, you need to pass to the linker options in the format -lLIBRARYNAME. Check the documentation for your library, as there may be more than one -l flag that needs to be added for the specific library in use.
Again, from the Bela IDE you can pass options to the linker using the “Make parameters” box. You can type in it:
LDLIBS=-lLIBRARYNAME;
In case you need to add multiple libraries, put them all between the “=” sign and the “;”, leaving a space between them, such as:
LDLIBS=-lLIBRARYNAME -lANOTHERLIB -lYETANOTHER;
Again, by default the linker will look in some folders including /usr/lib/, /usr/local/lib/, /lib/.
Any library installed via apt-get is probably going to be in one of these folders, so it will not require further configuration flags.
On the other hand, if you built the library yourself and you skipped the install phase, then you have to locate the compiled binary files (typically of the form libLIBRARYNAME.so and/or libLIBRARYNAME.a and tell the linker to look into the folder that contains them.
This can be done by passing the folder to the linker with the -L/path/to/binary/folder option.
This can be passed to the Makefile with the LDFLAGS= flag.
For instance, if the file libLIBRARYNAME.so is located in /root/LIBRARYNAME/build/lib, then you would write the following in the IDE’s “Make parameters” box:
LDFLAGS=-L/root/LIBRARYNAME/build/lib;
Note that in this box you can specify multiple make flags as long as you separate them with “;”.
So for instance, putting all of the above together, the content of the “Make parameters” box may look like this:
CPPFLAGS=-I/root/LIBRARYNAME/include;LDFLAGS=-L/root/LIBRARYNAME/build/lib;LDLIBS=-lLIBRARYNAME;
However, more often than not - especially if you used apt-get to install the library - only the LDLIBS=-lLIBRARYNAME will be necessary.
Last catch: runtime error
With the instructions above, your project will compile and link fine and will generate an executable which the IDE will run for you.
However unlikely, you may incur in a runtime error: if you are using a dynamic library and the dynamic loader cannot find the library’s binary file (the .so file), then the program will refuse to run.
This may happen if the .so file resides in a location that is outside the standard library path.
This would be the case, for instance, if you had to specify the LDFLAGS=-L... option above.
In order to make the dynamic loader aware of the path, you should run once the following command:
ldconfig /path/to/binary/folder
A practical example: pyo
pyo is a Python module written in C to help DSP script creation and it is one of the way you can process audio and sensors signal on Bela.
The module was developed by Olivier Bélanger, who also contributed a wrapper to get pyo to run on Bela.
The example pyo-Bela project consists of a mix of .cpp and .h files and depends on the library libpython2.7, which is already installed on the board.
The library’s header file is called Python.h.
This is a good example of a project which relies on an external library.
In order to get started with the project, you need to:
- get yourself a copy of the pyo source code. Either
git cloneor download from here. - create a new C++ project in the Bela IDE
- drag on it the
.cppand.hfiles from the folderpyo-bela/common. DO NOT include thesettings.jsonfile.
If you hit the “run” button at this point, then you will get the following error:
Building PyoClass.cpp...
Build finished
In file m_pyo.h: 'Python.h' file not found column: 10, line: 2
this error is thrown by the compiler while pre-compiling the file PyoClass.cpp.
If you open the file in the IDE, you can see it contains the following line:
include "Python.h"
but the compiler cannot find the file Python.h because it is not located in one of the standard include paths, rather it is in /usr/include/python2.7, so you will have to specify this path in the “Make parameters” box:
CPPFLAGS=-I/usr/include/python2.7;
Hit the “run” button again and this time all the files will be compiled:
Building project...
Building PyoClass.cpp...
...done
Building main.cpp...
...done
Building render.cpp...
...done
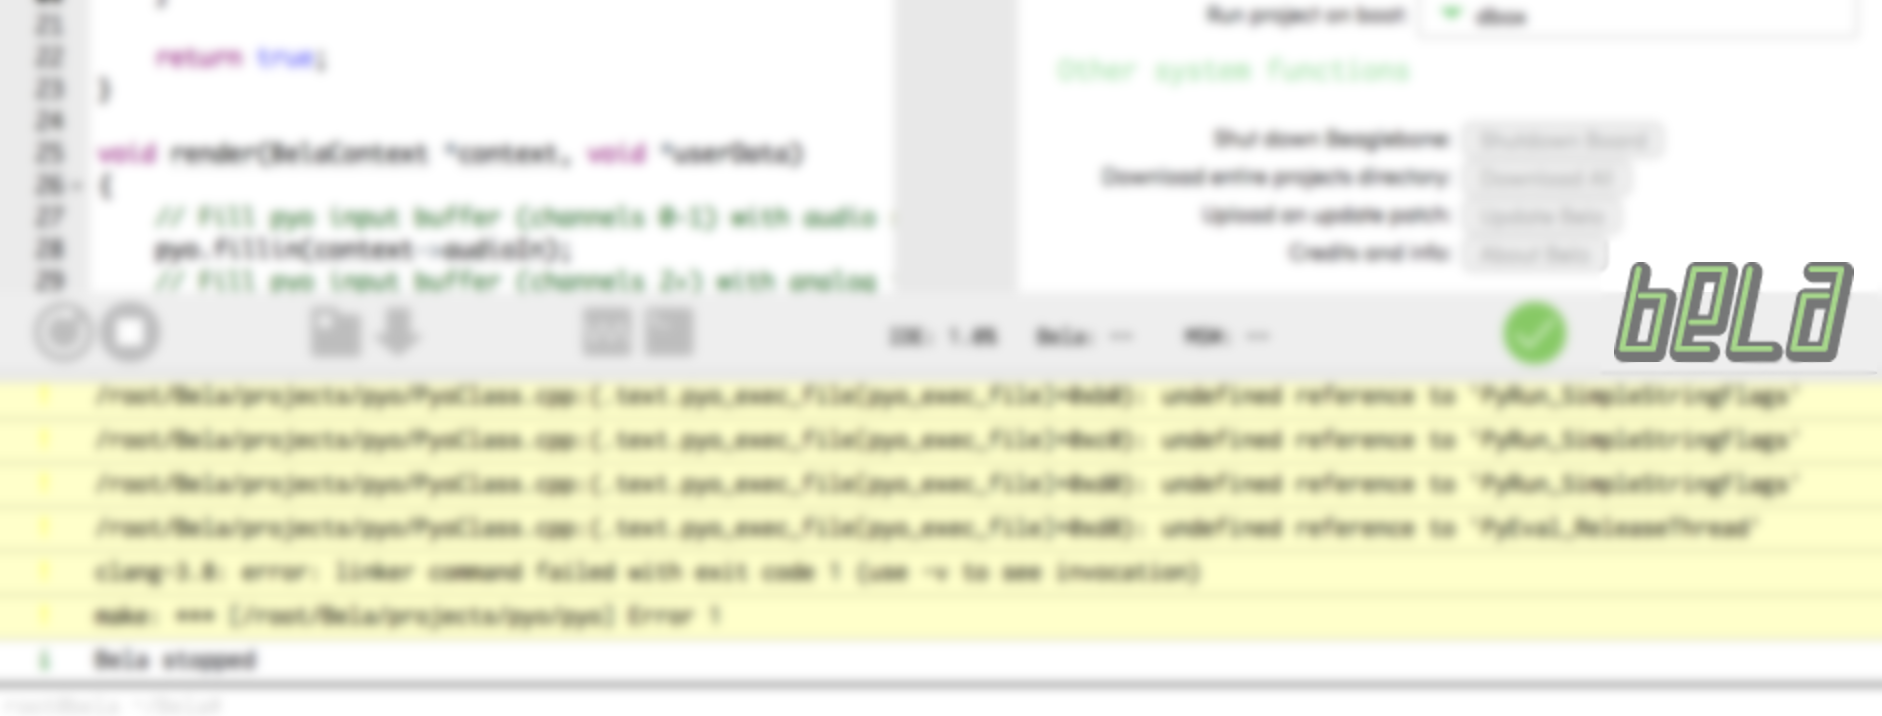
Unfortunately, the link stage will fail with a long error message:
Linking...
Build finished
/root/Bela/projects/pyo/build/PyoClass.o
: In function `Pyo::setup(int, int, int, int)':
/root/Bela/projects/pyo/PyoClass.cpp:(.text+0x3c): undefined reference to `PyEval_AcquireThread'
/root/Bela/projects/pyo/PyoClass.cpp:(.text+0x4c): undefined reference to `PyImport_AddModule'
/root/Bela/projects/pyo/PyoClass.cpp:(.text+0x58): undefined reference to `PyObject_GetAttrString'
/root/Bela/projects/pyo/PyoClass.cpp:(.text+0x5c): undefined reference to `PyString_AsString'
...
The “undefined reference” message means that the linker could not find a definition for a symbol (e.g.: a method, a function, a global variable) that was declared in a header files.
In other words, it means that the library - which contains these definitions - is not linked in.
You have to manually add to the “Make parameters” the instructions for the linker to link in the library.
Add the following to what is already in the box:
LDLIBS=-lpython2.7;
so that it looks like this:
CPPFLAGS=-I/usr/include/python2.7;LDLIBS=-lpython2.7;
As the file libpython2.7.so resides in one of the standard folders, there is no need to specify an additional search path for the library with the -L option.
Hit the “run” button again and the project will happily link and run. That’s it: your Bela program using an external library is up and running.
Enjoy pyo
Once your program start you will probably get the following message:
Error: file "main.py" not found
Couldn't initialise audio rendering
Error: unable to initialise audio
make: *** [runide] Error 255
This has nothing to do with the topic of an external library, rather it has to do with how the Bela wrapper for pyo works: it requires you to have a file called main.py in the project folder, which will contain your DSP chain definition.
You can find a collection of example .py files in the pyo-bela/examples folder from the pyo-bela repo.
Pick one of those files, rename it to main.py and drop it in the project folder.
Hit run again and you will get some amazing sounds out of your board!
Conclusion
We showed how to use an external library within a Bela project.
How easy the whole process is really depends on whether the library you need is available through the apt package manager or how straightforward the library developers’ instructions are.
apt itself provides a wide catalogue of thousands of libraries, and often times building the library yourself is far from impossible.
We hope you learned something useful in the process, about what libraries are, how they work and how to interpret the often obscure error messages during the build process.